Hello nerds! I’m using this blog to write about games that I love. I’ll be adding some walkthroughs, reviews, and some nerdy things that I find along the way. If there’s a certain game you think I should try out, leave me a comment!
Animal Crossing: New Horizons Redd’s Paintings and Statues Guide
Oh Redd…this sneaky little turd. With the newest update, he’ll randomly come visit your island on a boat. You’ll first encounter him wandering around on your island, but after that, you’ll need to grab your ladder and go to the small beach at the top of your map; that’s where he’ll be docking his boat. You’ll know he’s in town because Isabelle will mention a shady salesman is in town during the announcements.
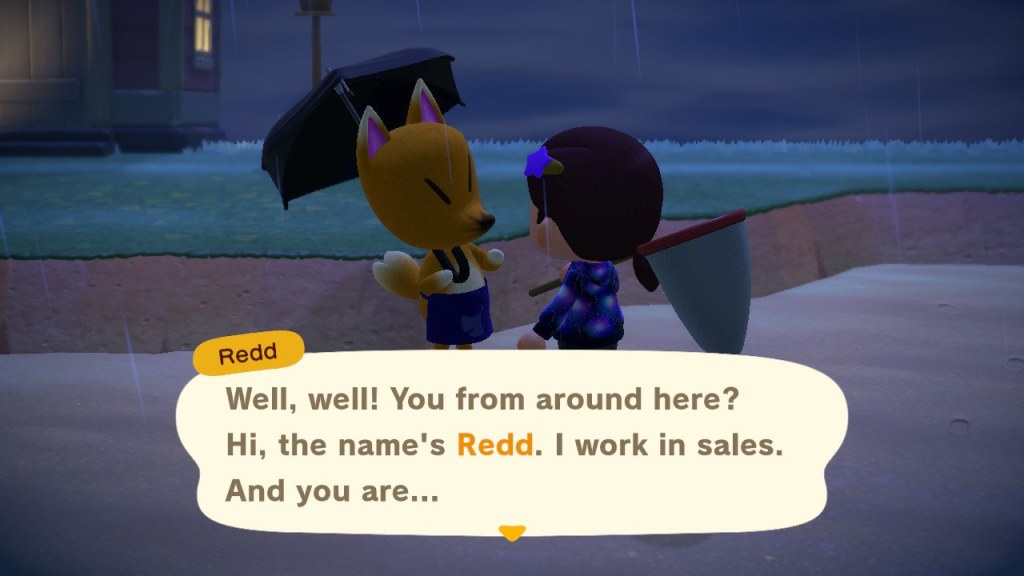
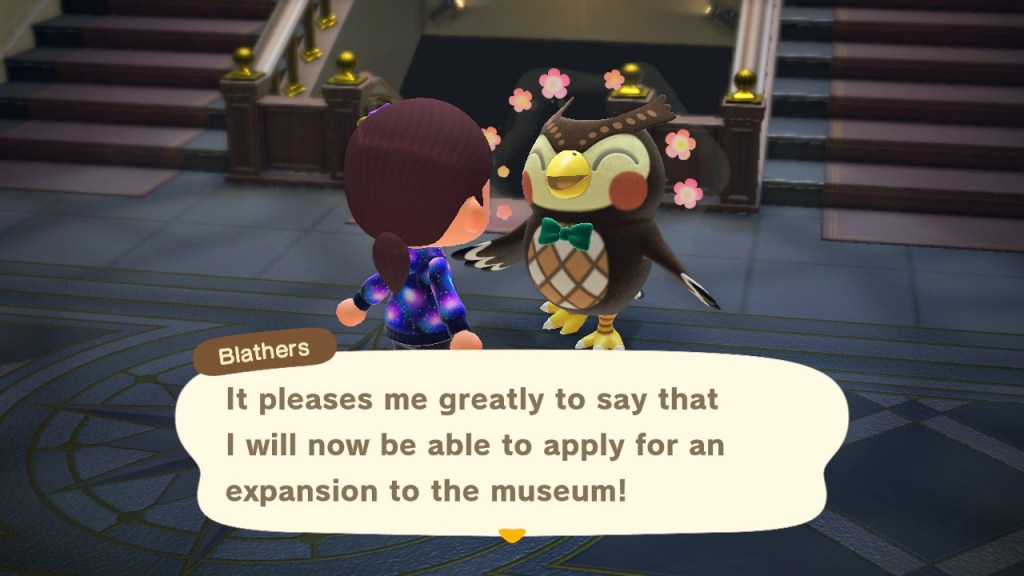
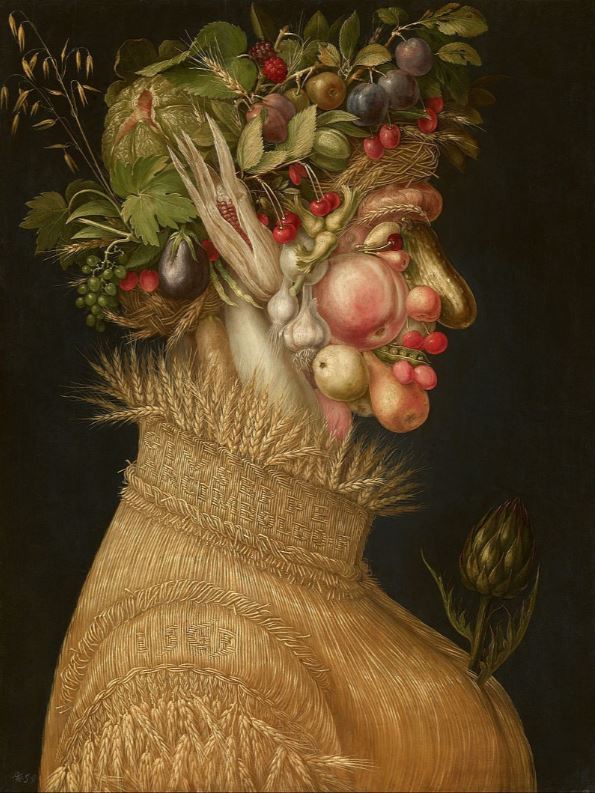
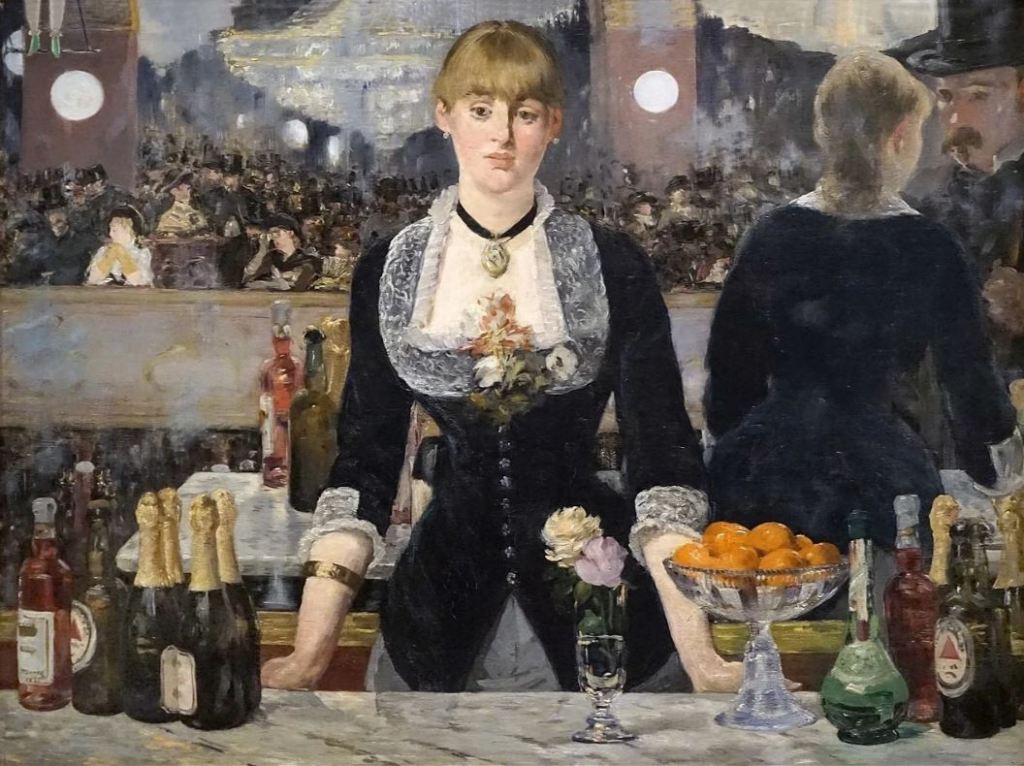
Redd sells paintings and statues, and you want to find the real ones to display in the museum. The catch is that you can only purchase one painting or statue from Redd per visit, and there’s a good chance he’s selling you a fake. The fakes cannot be sold at Nook’s or displayed in the museum, so you’re stuck with them. You can display them in your house or give them as a gift to a friend though. It’s worth noting that the first time you speak with Redd, he’ll offer you a painting for almost half a million bells, when you say no, he’ll lower the price to about 5,000. Do buy this one, his first painting will always be a real one. Take it to the museum and donate it, that will initiate the remodeling of the museum to include the art gallery.
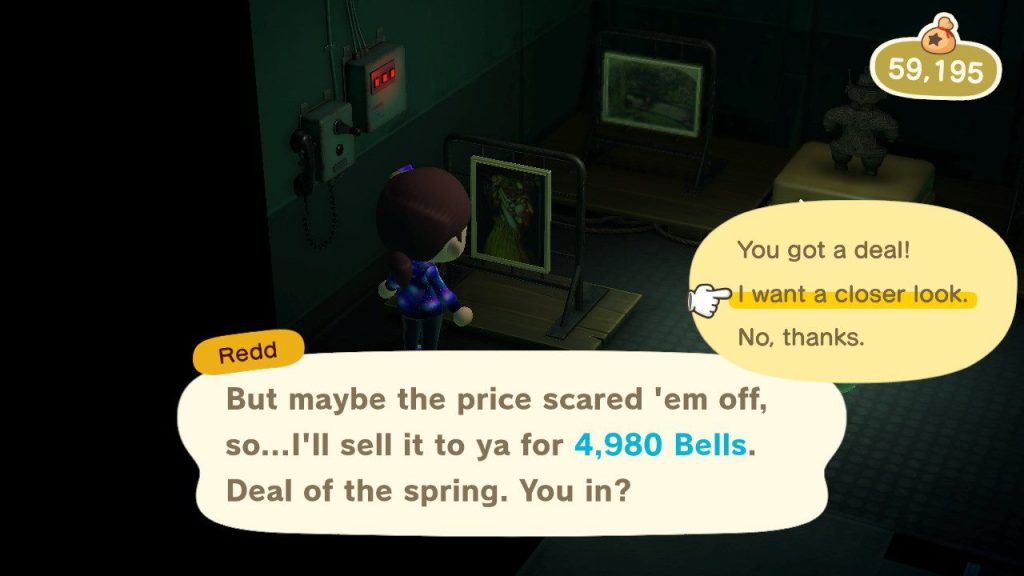
When purchasing a painting or a statue, the inside of the ship is pretty dark. Luckily, you have the option to take a closer look before purchasing so that you don’t accidentally give this turd all your bells for a piece of shit fake ass piece of art.

I’ve included an alphabetical list of each painting and statue along with the real names of the art and how to tell the difference between the reals and the fakes.
paintings
Real
Fake
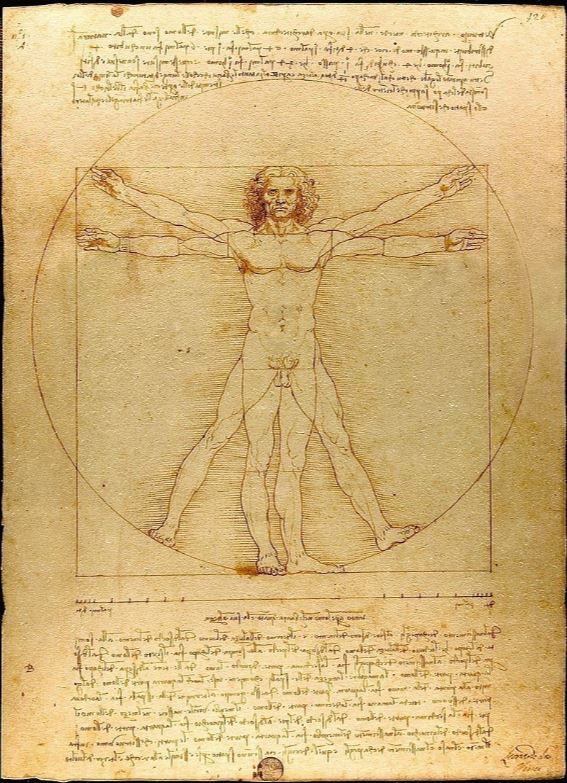
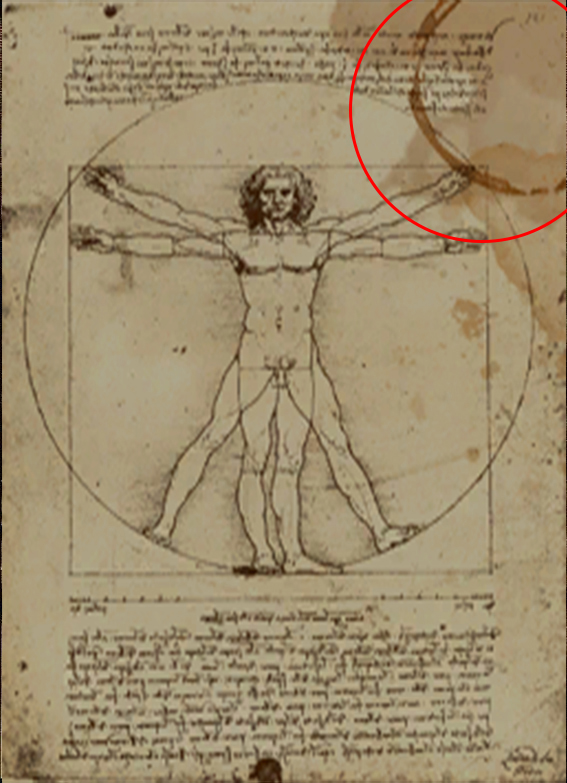
Academic Painting: Vitruvian Man by Leonardo Da Vinci
The fake has a coffee ring in the upper right hand corner.
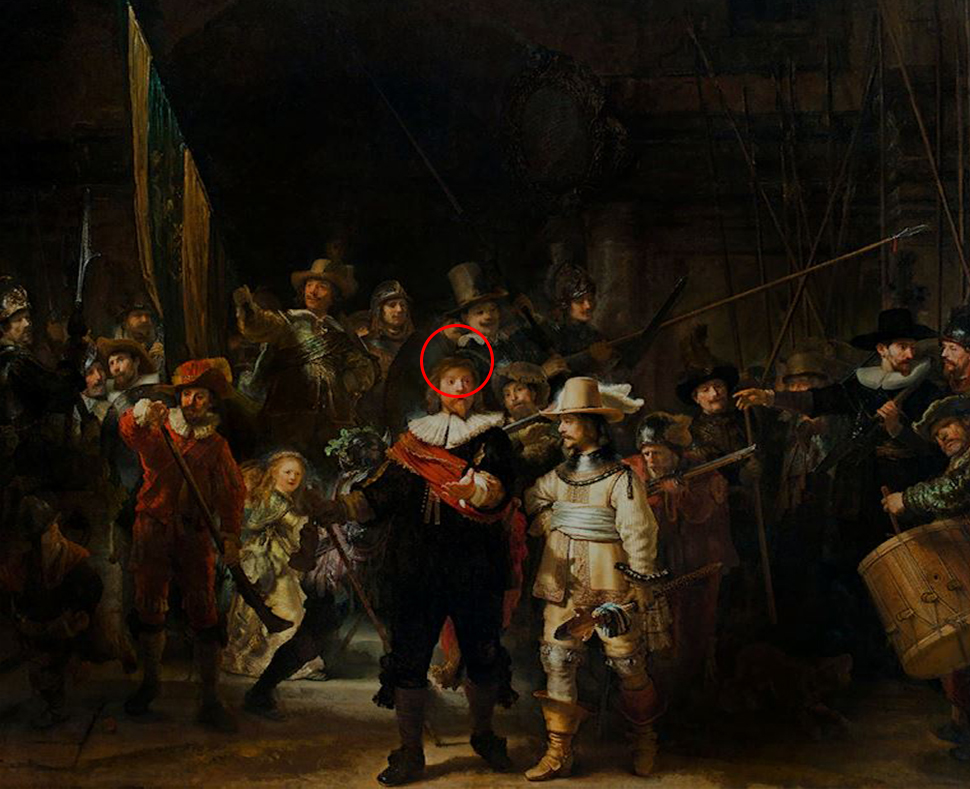
Amazing Painting: The Night Watch by Rembrandt
The fake removes the black hat from the man in the center.

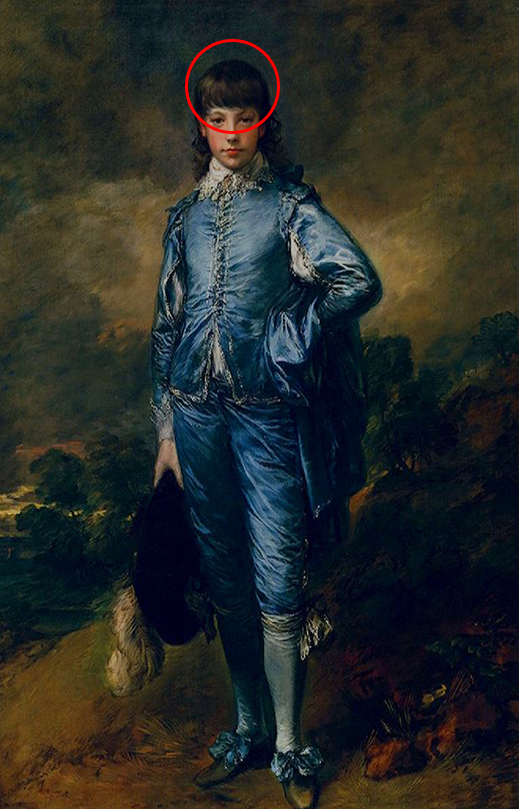
Basic Painting: The Blue Boy by Thomas Gainsborough
The fake has a full set of bangs on the boy.

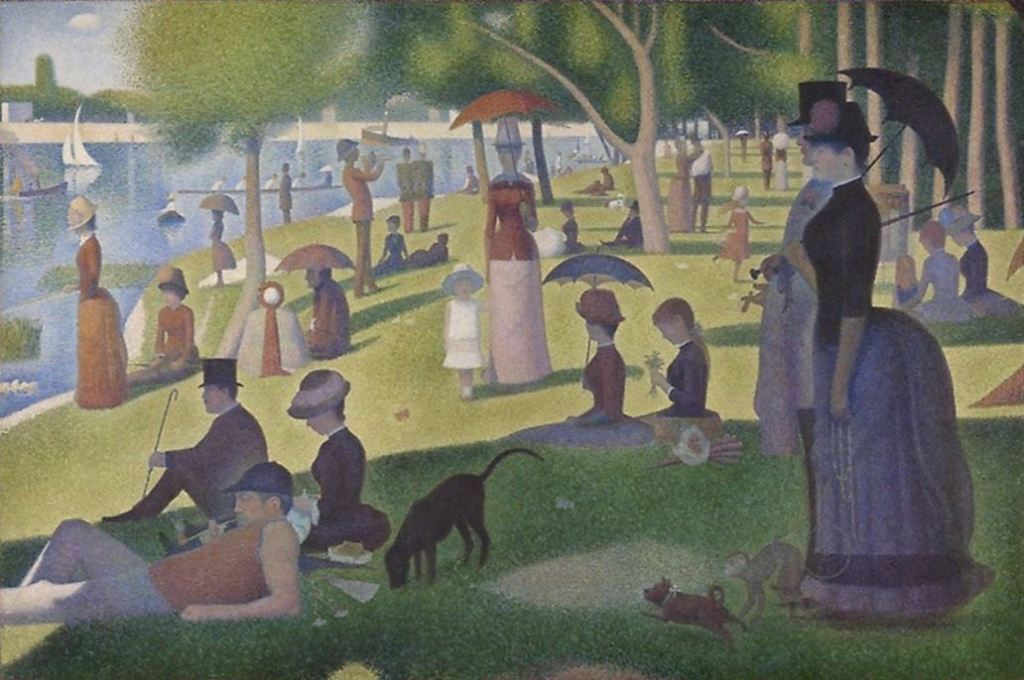
Calm Painting: A Sunday Afternoon on the Island of La Grande Jatte by Georges Seurat.
No fake for this one!
Common Painting: The Gleaners by Jean-François Millet.
No fake for this one!

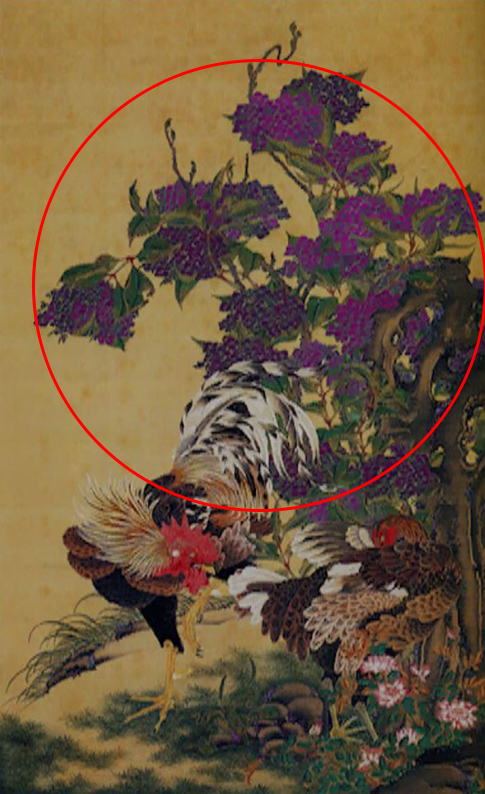
Detailed Painting: Rooster and Hen with Hydrangeas by Ito Jakuchu.
The fake has purple flowers.

Dynamic Painting: Great Wave off Kanagawa by Katsushika Hokusai.
No fake for this one!

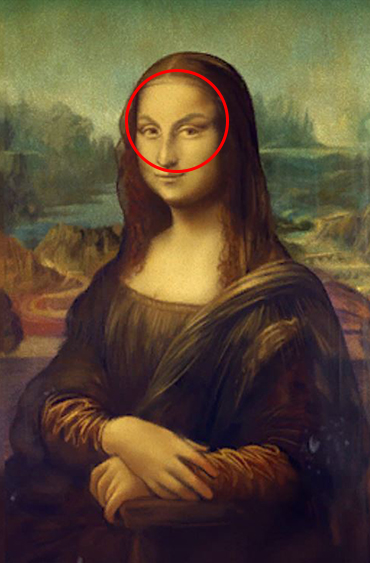
Famous Painting: The Mona Lisa by Leonardo da Vinci.
The fake has added some expressive eyebrows.

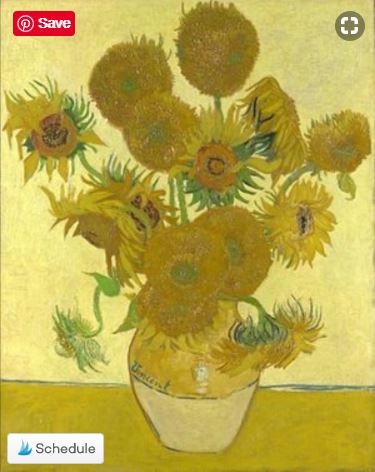
Flowery Painting: Sunflowers by Vincent Van Gogh.
No fake for this one!
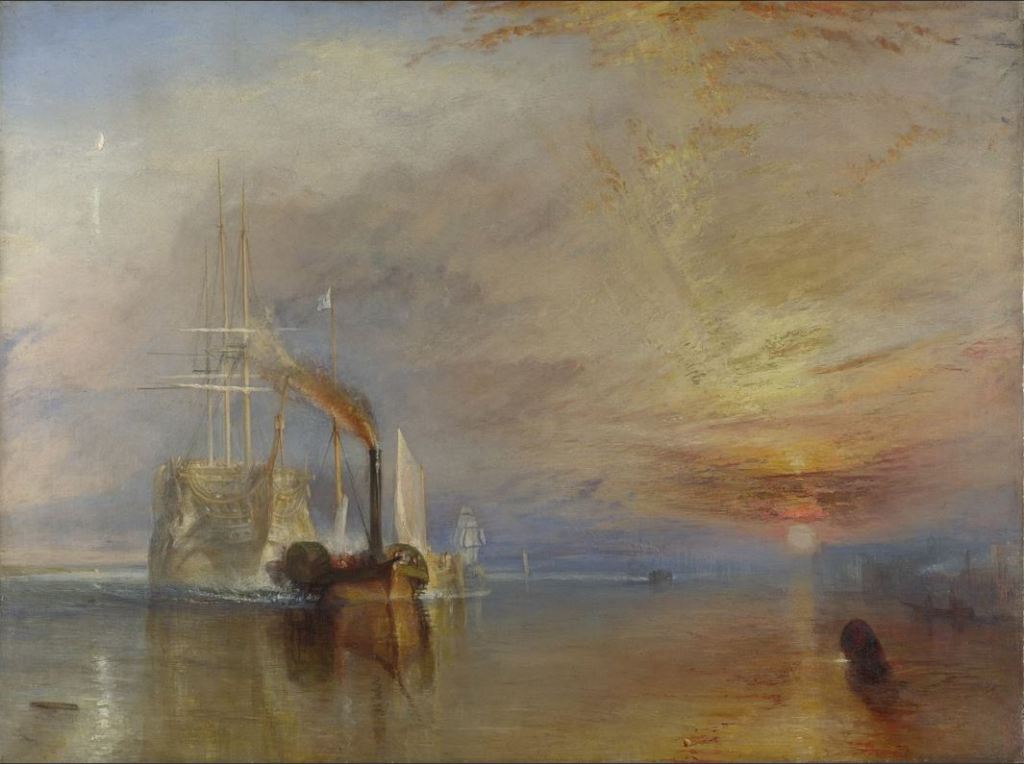
Glowing Painting: The Fighting Temeraire by Joseph Mallord William Turner.
No fake for this one!
Graceful Painting: Beauty Looking Back by Hishikawa Moronobu.
The fake has the woman taking up most of the canvas, the real one has more empty space above her.


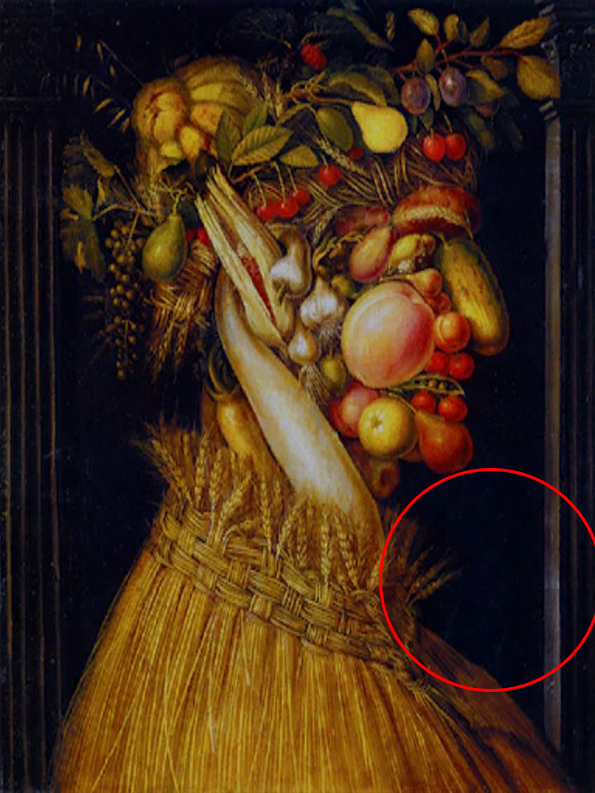
Jolly Painting: Summer by Giuseppe Arcimboldo.
The fake removes the flower coming from the figure’s chest in the bottom right corner.
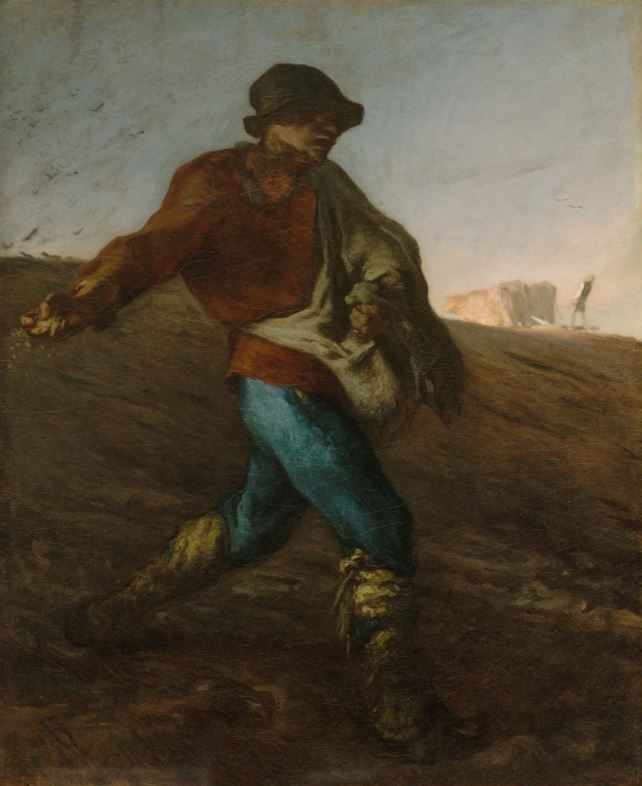
Moody Painting: The Sower by Jean-François Millet.
No fake for this one!
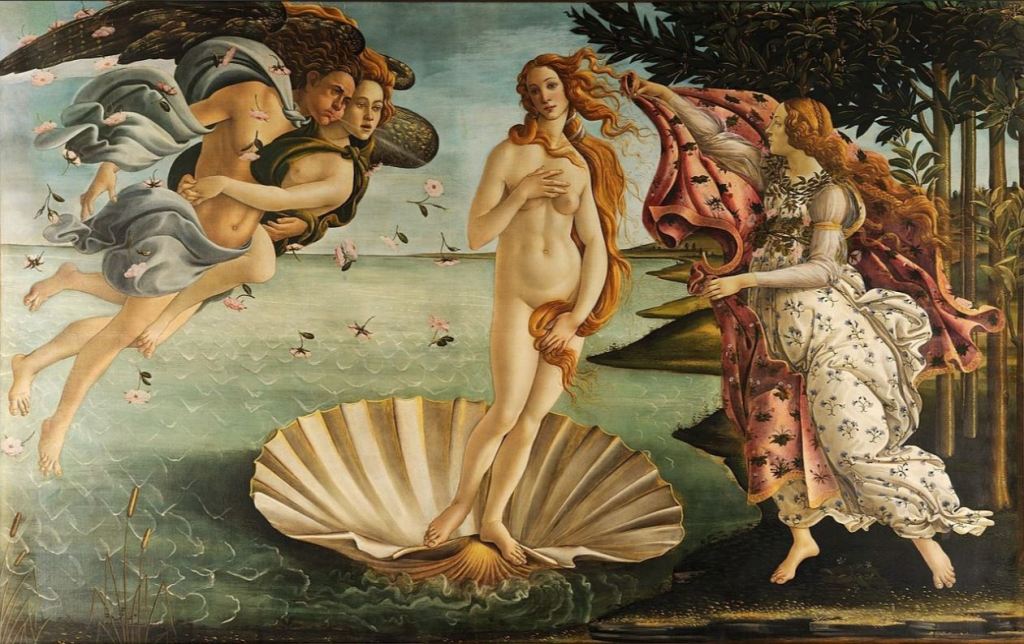
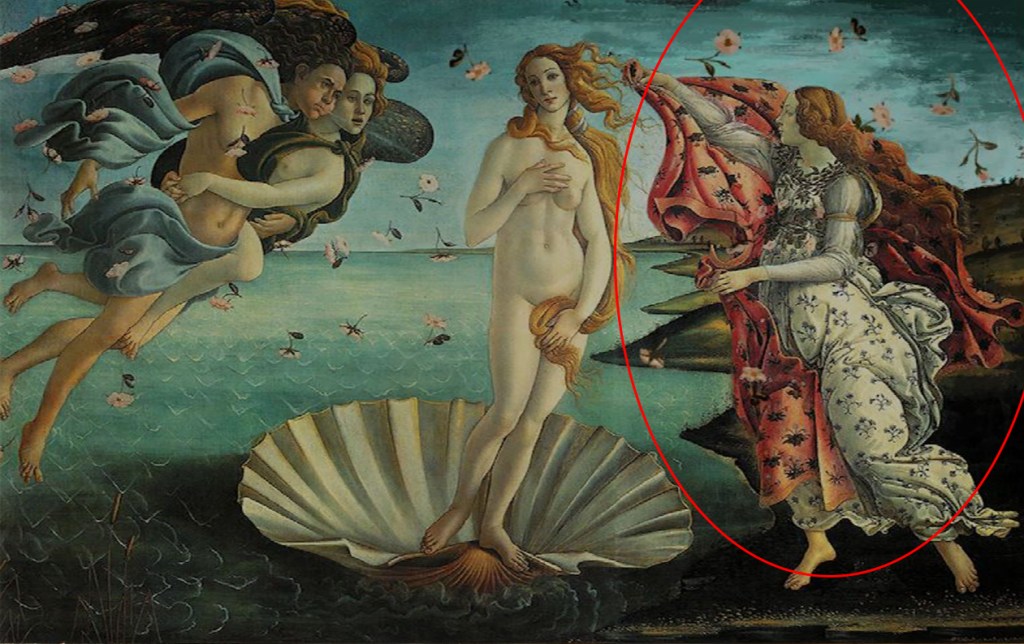
Moving Painting: The Birth of Venus by Sandro Botticelli.
The fake omits the tress in the background on the right side.
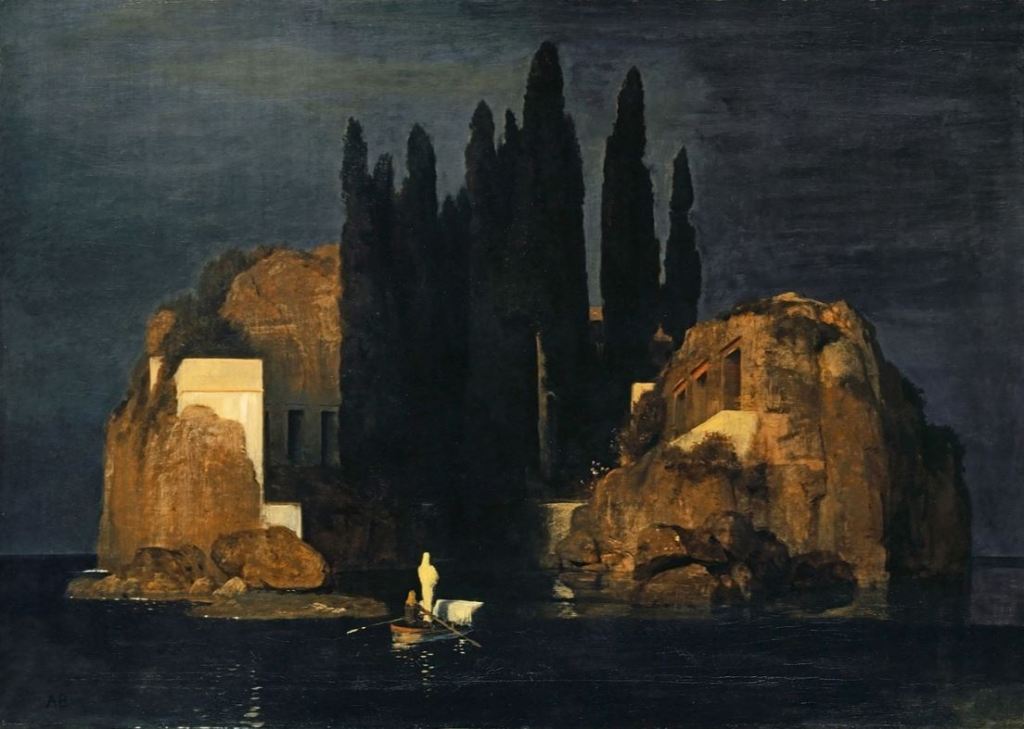
Mysterious Painting: Isle of the Dead by Arnold Böcklin.
No fake for this one!
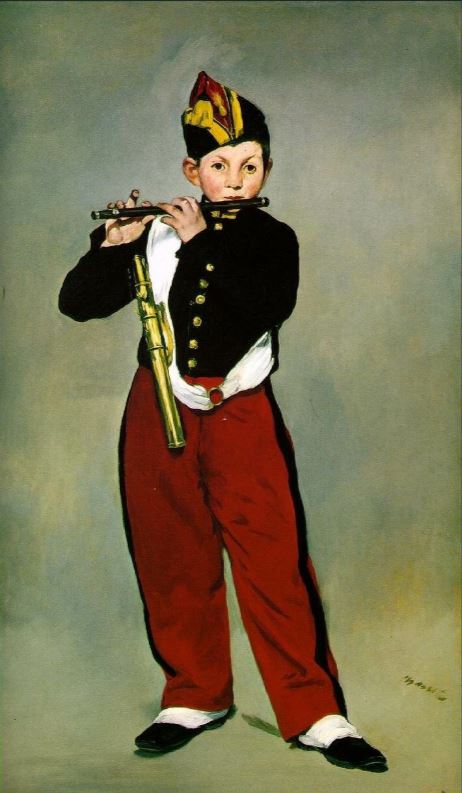
Nice Painting: Young Flautist or The Fifer by Édouard Manet.
No fake for this one!
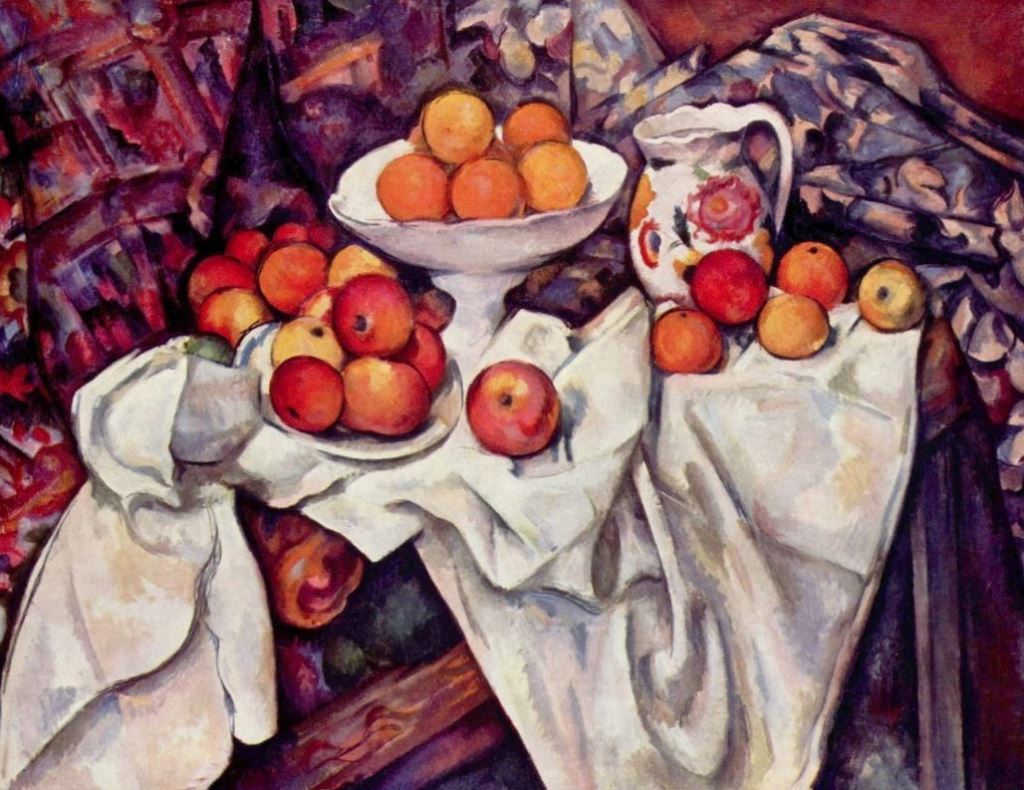
Perfect Painting: Apples and Oranges by Paul Cézanne.
No fake for this one!
Proper Painting: A Bar at the Folies-Bergère – Édouard Manet.
No fake for this one!
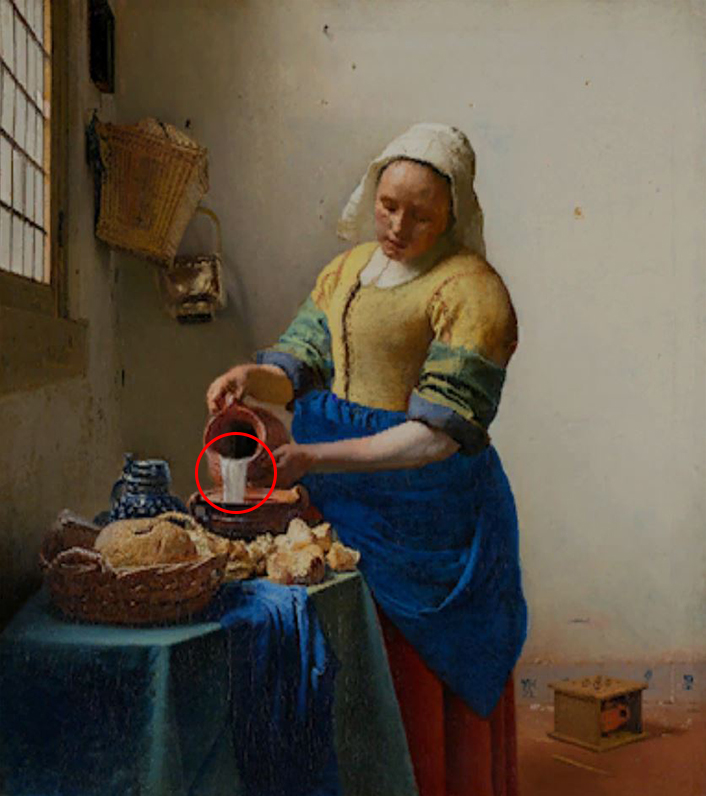
Quaint Painting: The Milkmaid by Johannes Vermeer.
The fake has a wider stream of milk pouring from the jug.

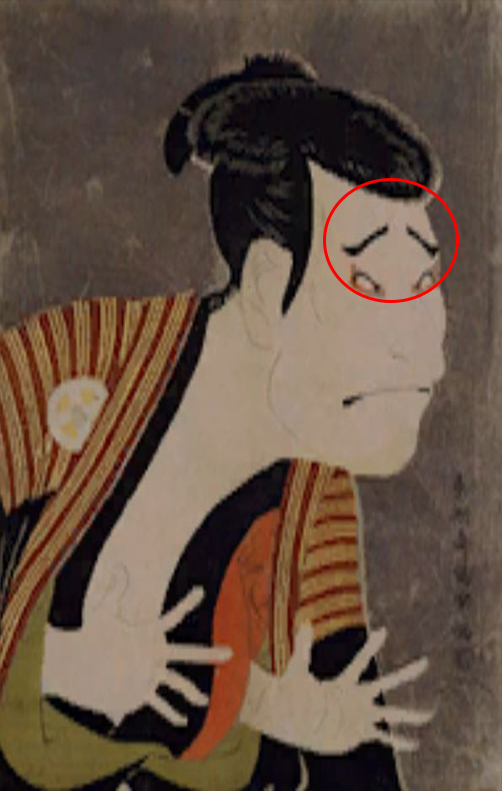
Scary Painting: Ōtani Oniji III as the manservant Edobei by Toshusai Sharaku.
The fake has the eyebrows upside down.

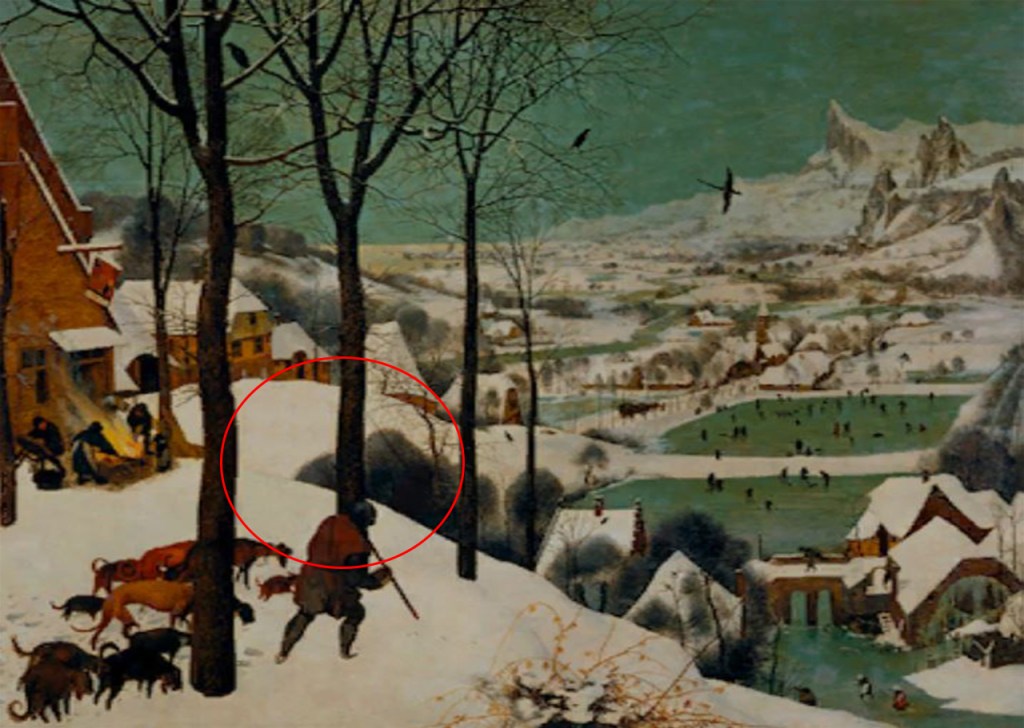
Sceneic Painting: The Hunters in the Snow by Peiter Bruegel.
The fake omits two hunters in between the tress on the left side.

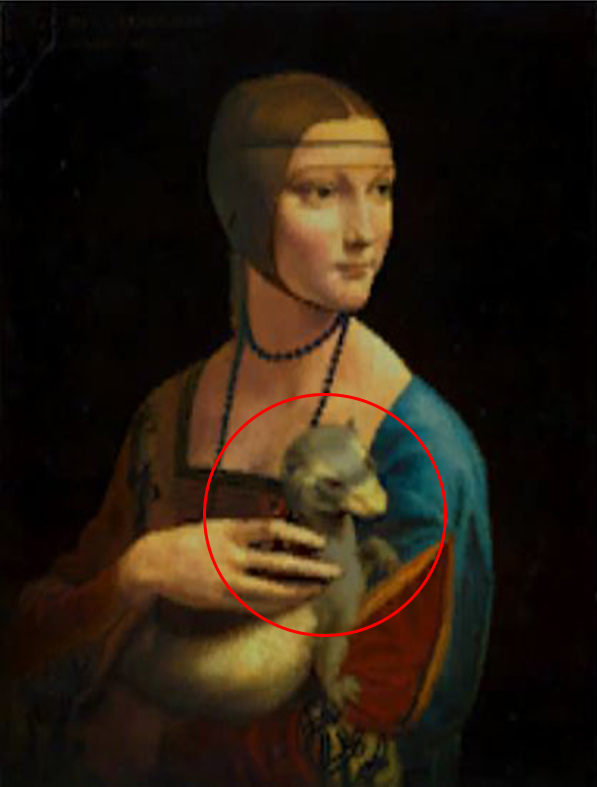
Serene Painting: Lady with an Ermine by Leonardo da Vinci.
The fake has the coloring of the ermine more gray, the real one will be more white.

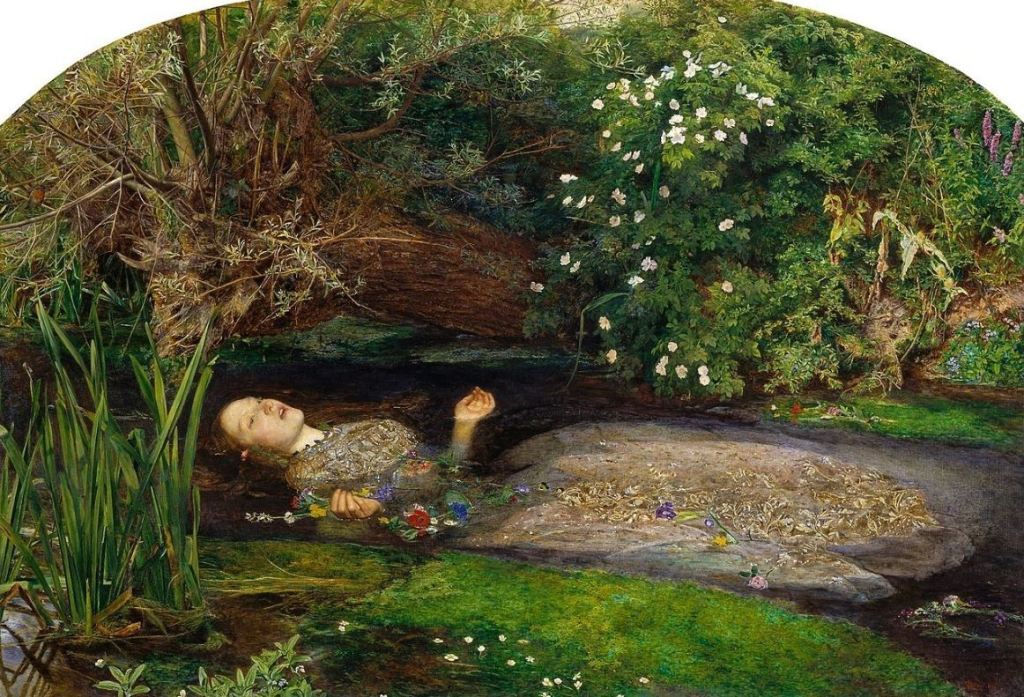
Sinking Painting: Ophelia by John Everett Millais.
No fake for this one!
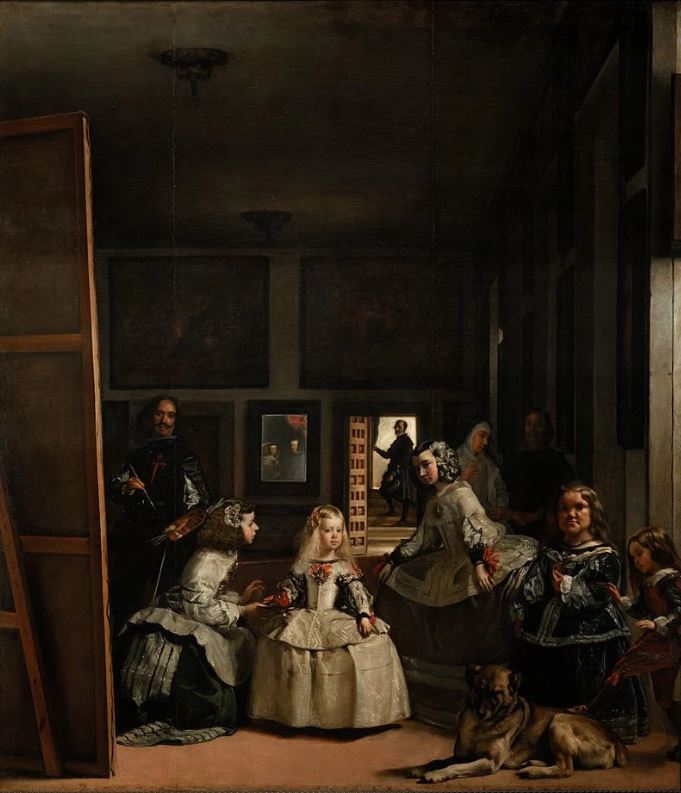
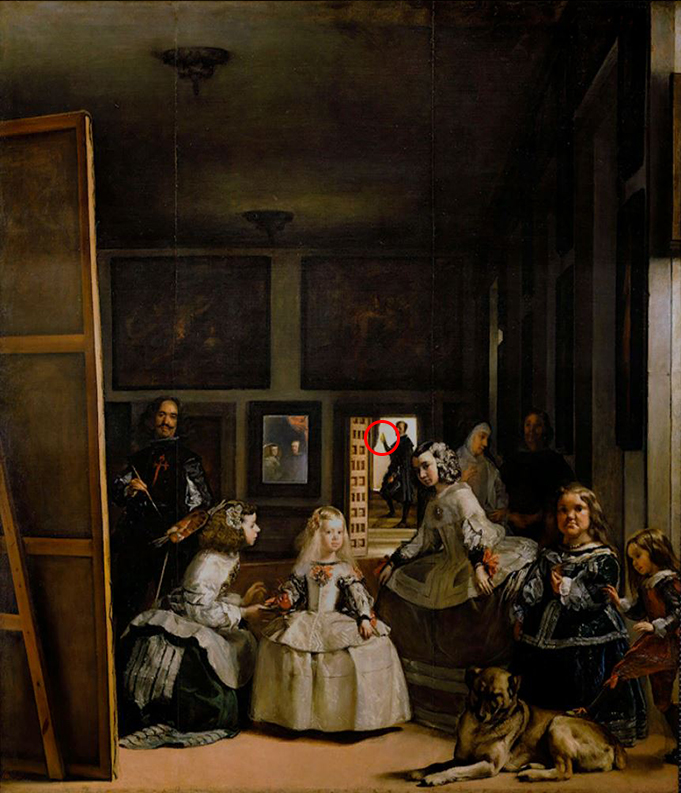
Solumn Painting: Las Meninas by Diego Velasquesz.
The fake has the man in the doorway in background pointing upwards, in the real one, he’s reaching more forwards than upwards.
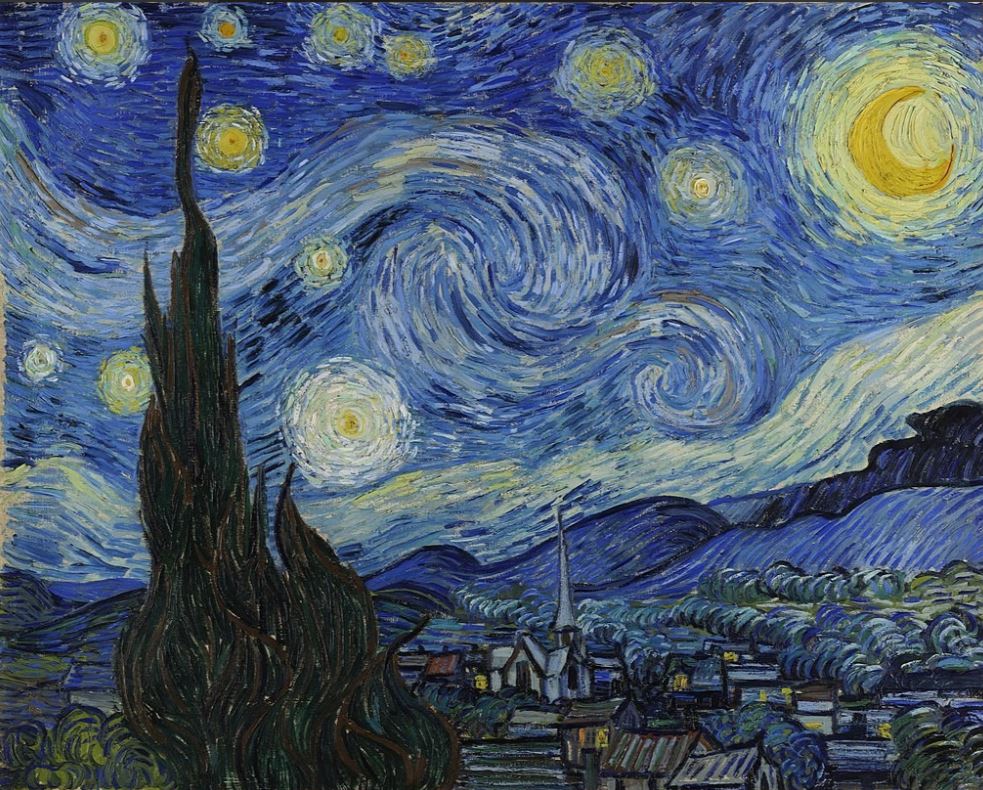
Twinkling Painting: The Starry Night by Vincent Van Gogh.
No fake for this one!
Warm Painting: The Clothed Maja by Francisco De Goya.
No fake for this one!

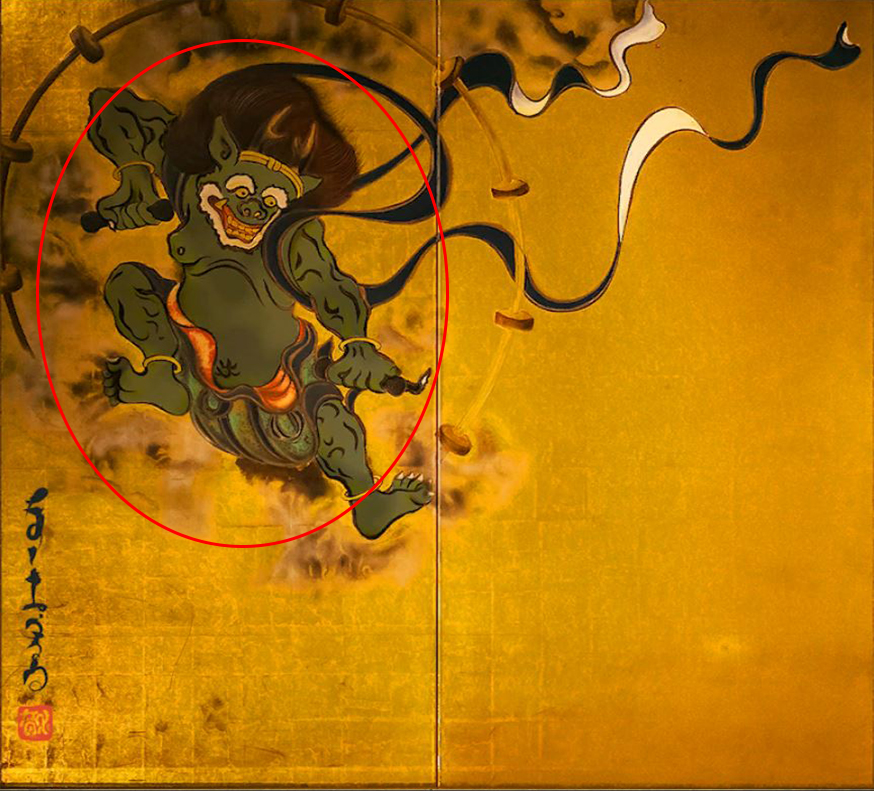
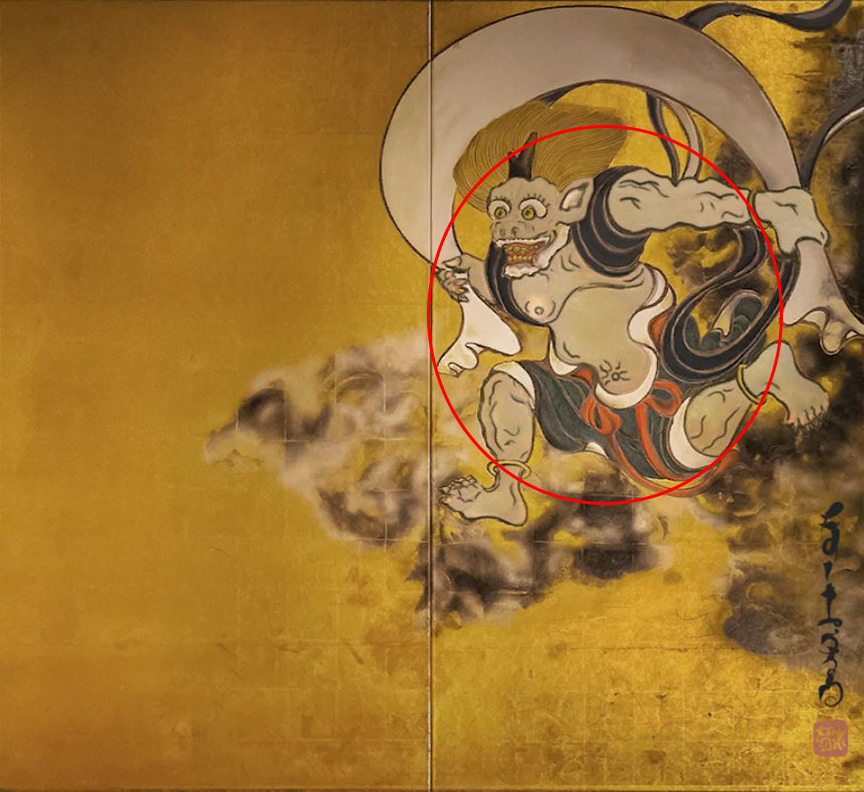
Wild Painting (Left): Wind God and Thunder God by Tawaraya Sōtatsu.
The fake will have the creature in a green color, in the real one he is white.
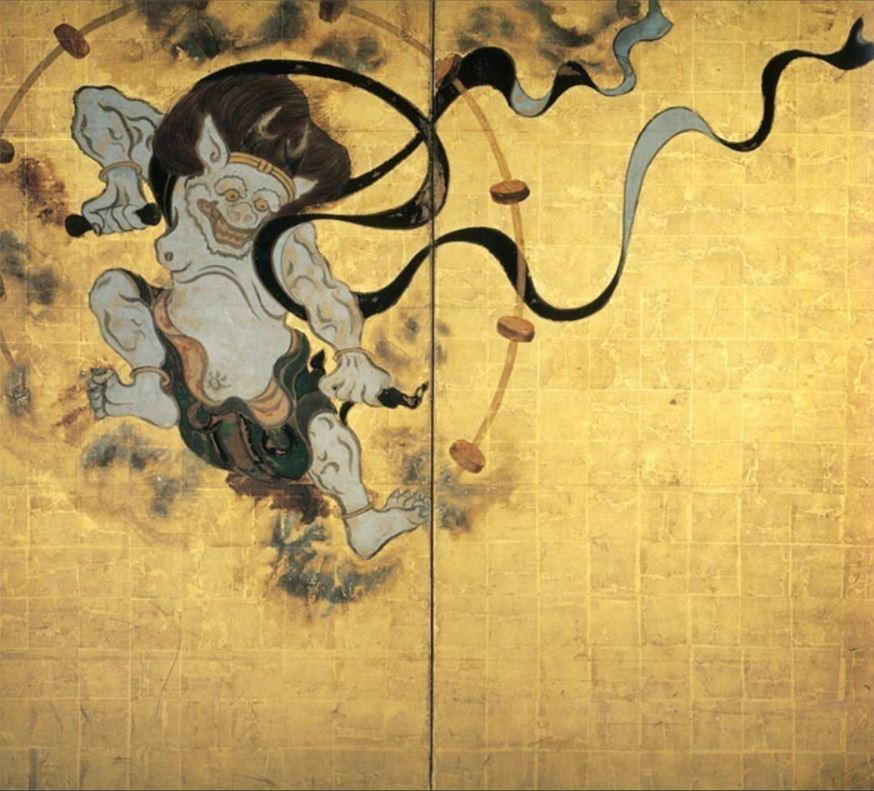
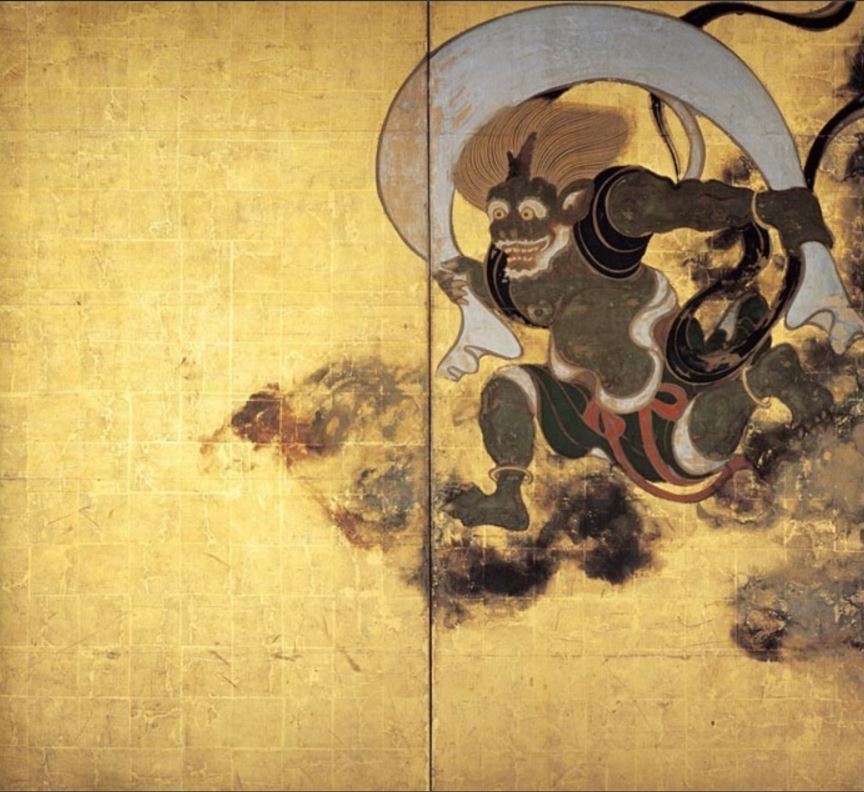
Wild Painting (Right): Wind God and Thunder God by Tawaraya Sōtatsu.
The fake will have the creature in white, in the real one he is green.
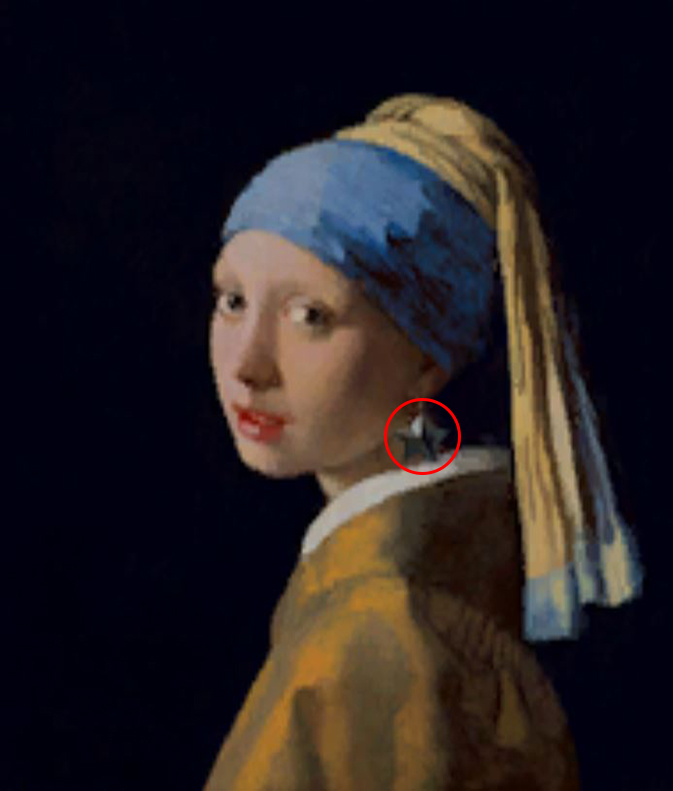
Wistful Painting: Girl with a Pearl Earring by Johannes Vermeer.
The fake changes the pearl earring into a star shape.

Worthy Painting: Liberty Leading the People by Eugène Delacroix.
No fake for this one!

Statues
Real
Fake
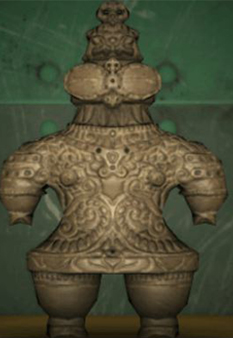
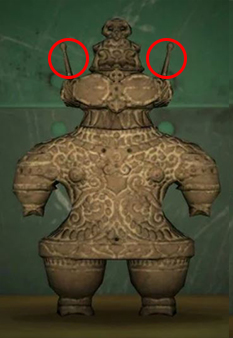
Ancient Statue: Dogū by Unknown.
The fake will add antenna to the sides of the figure’s head.
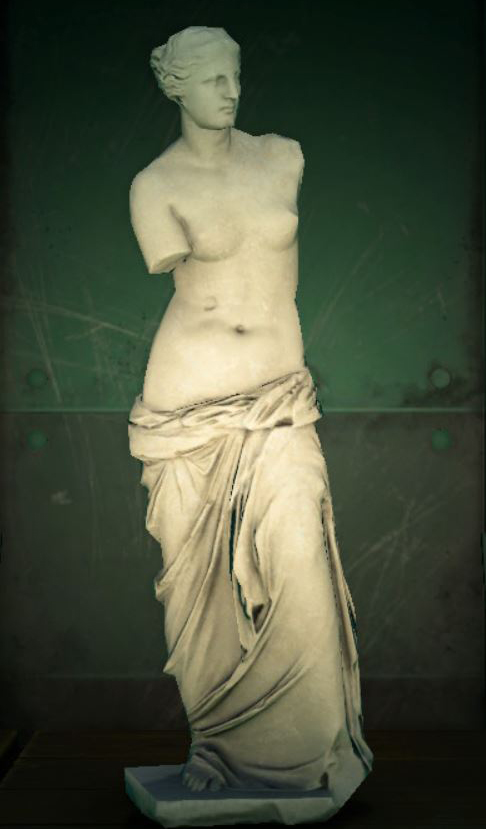
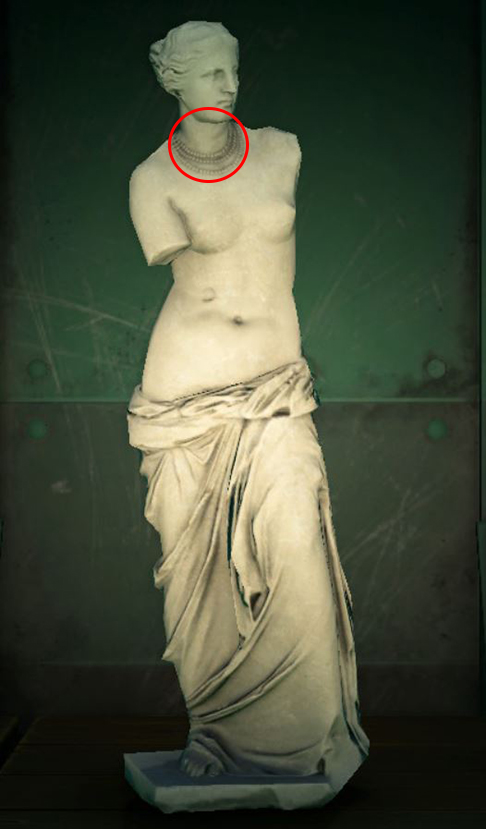
Beautiful Statue: Venus de Milo by Alexandros of Antioch.
The fake one is wearing a necklace.
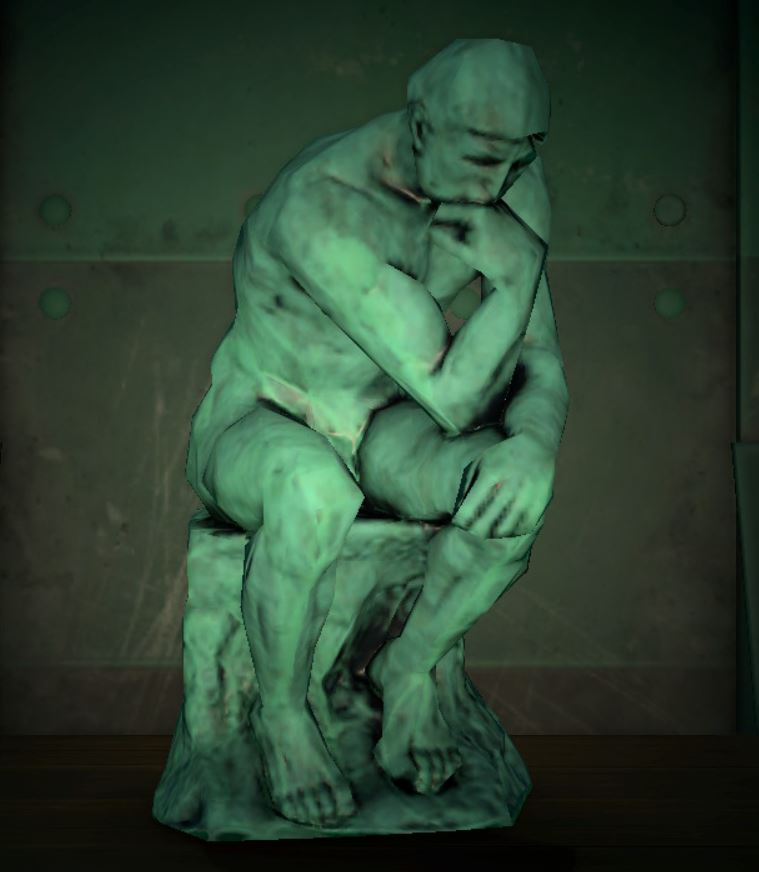
Familiar Statue: The Thinker by Auguste Rodin.
No fake for this one!
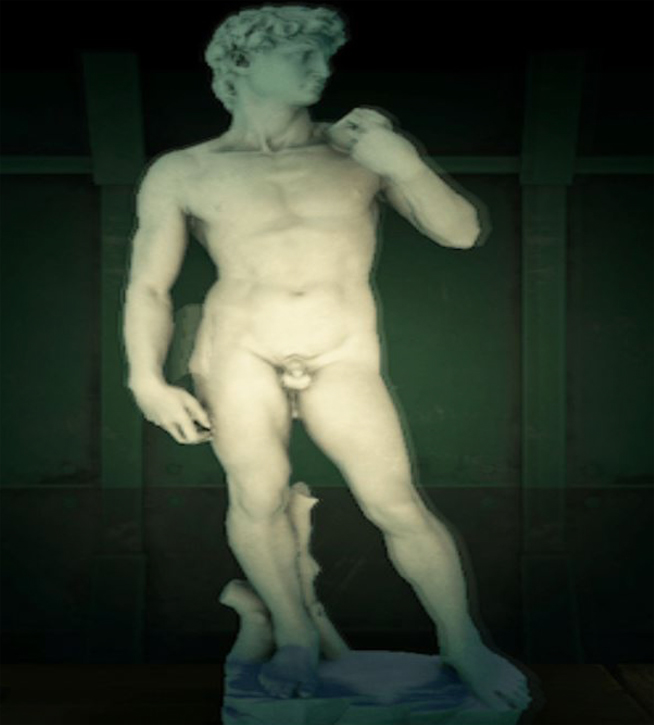
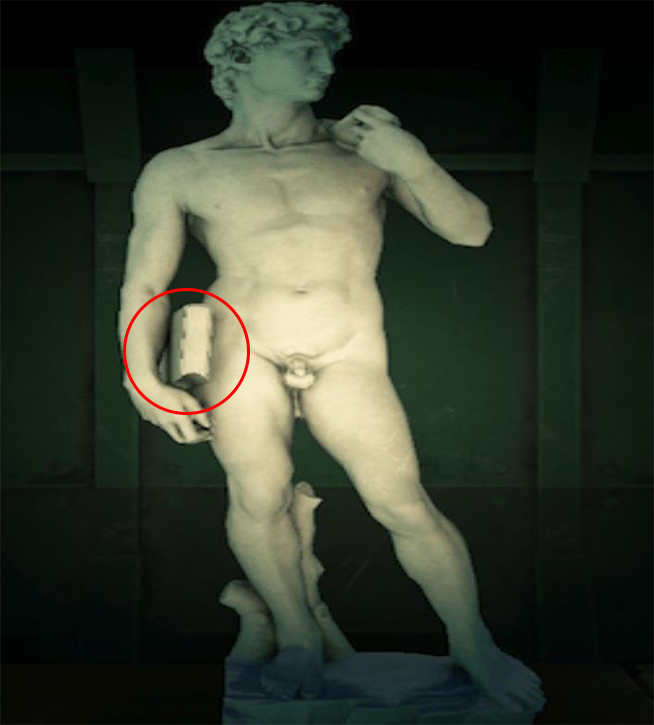
Gallant Statue: David by Michelangelo.
The fake has a book tucked under his arm on the left side.
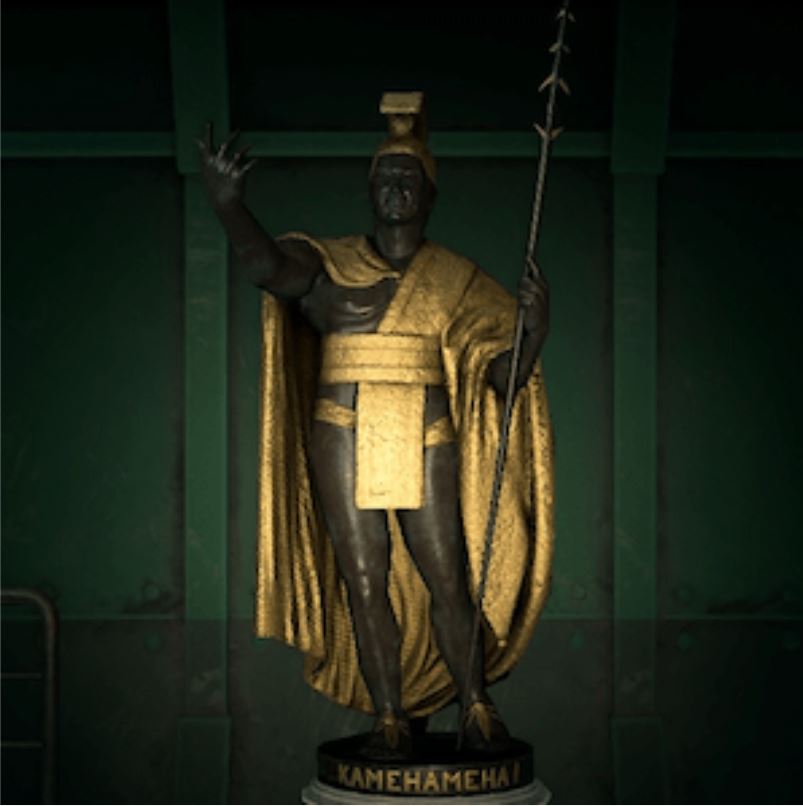
Great Statue: King Kamehameha I by Thomas R. Gould.
No fake for this one!
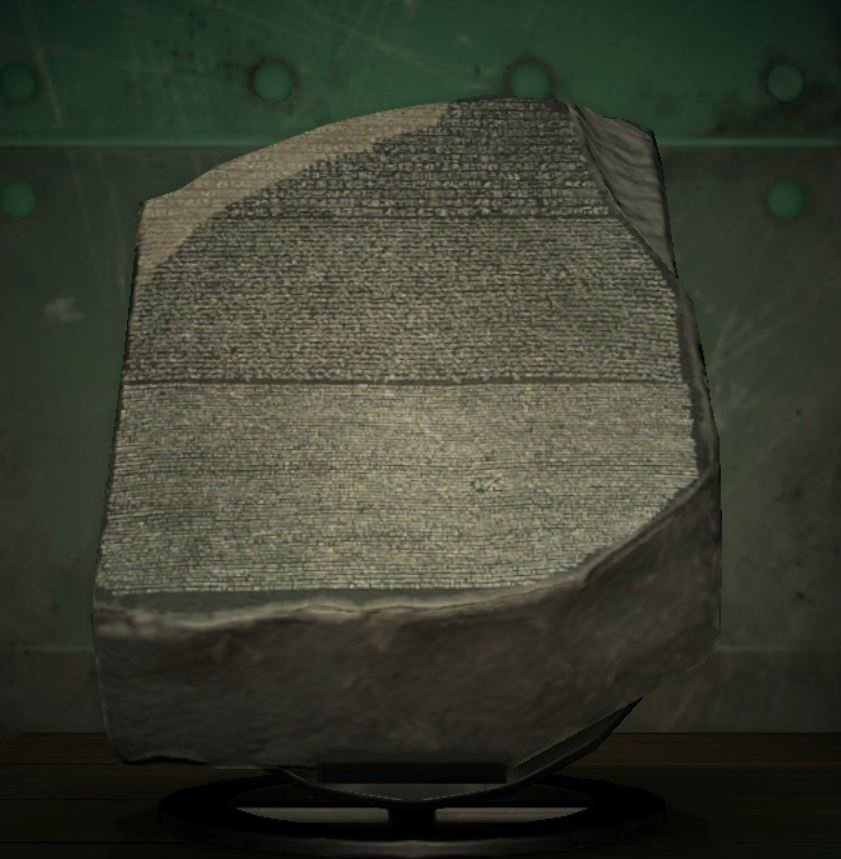
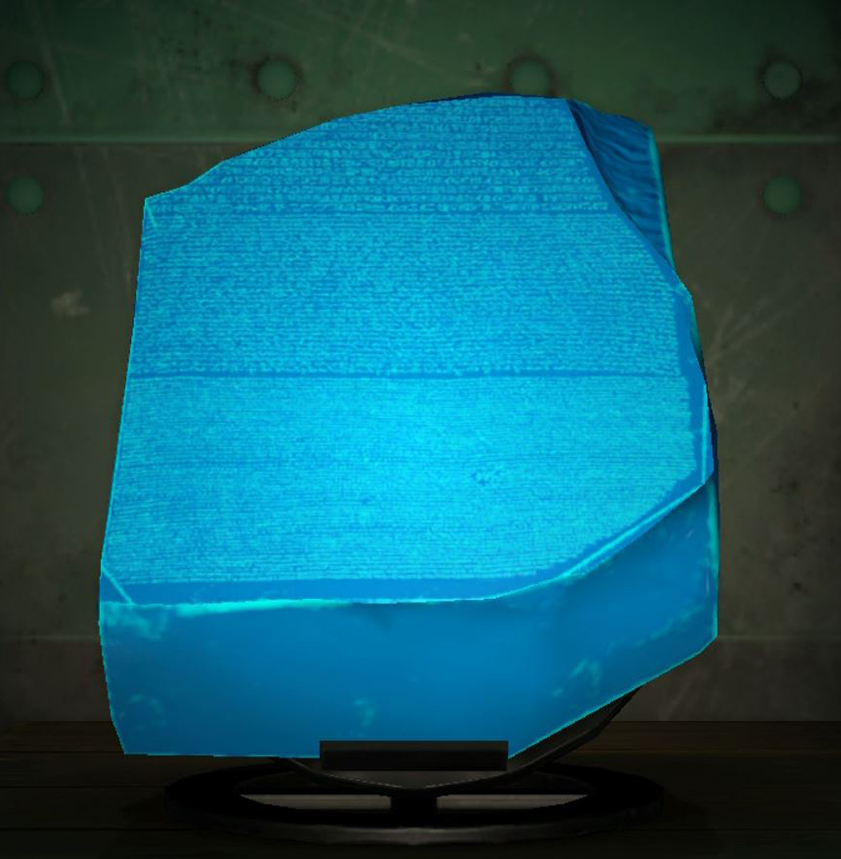
Informative Statue: Rosetta Stone by Unknown.
The fake will be blue.
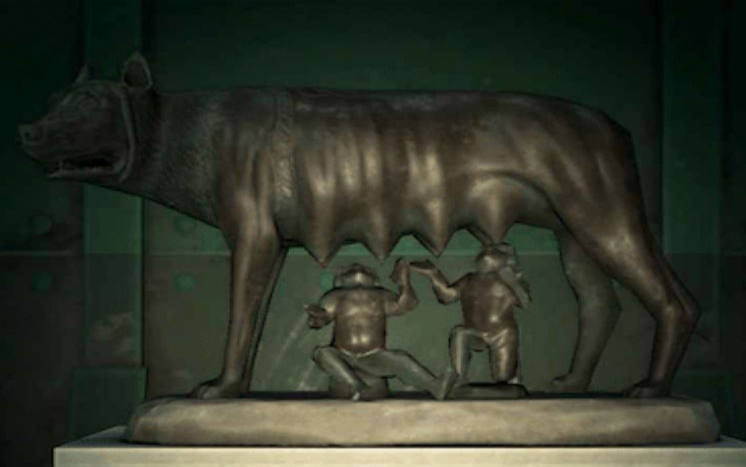
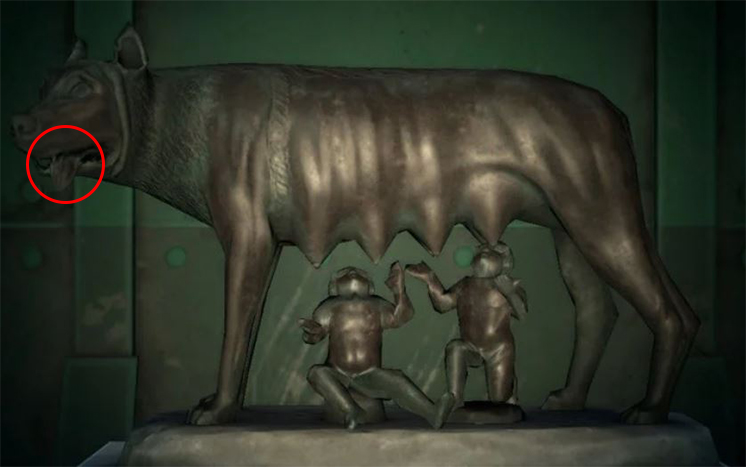
Motherly Statue: The Capitoline Wolf.
The fake has a tongue hanging out of the figures mouth.
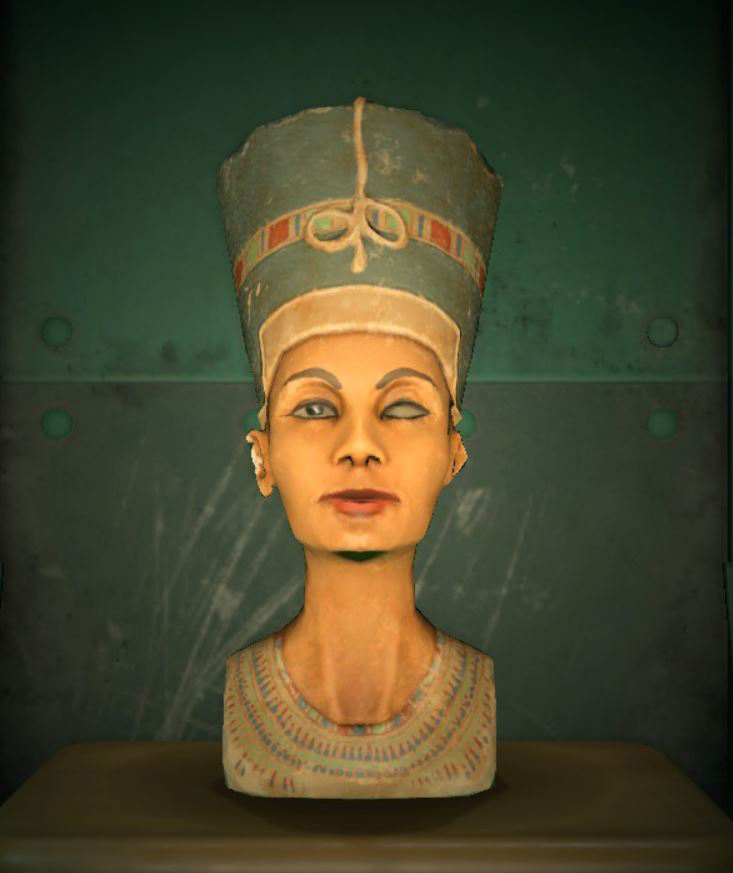
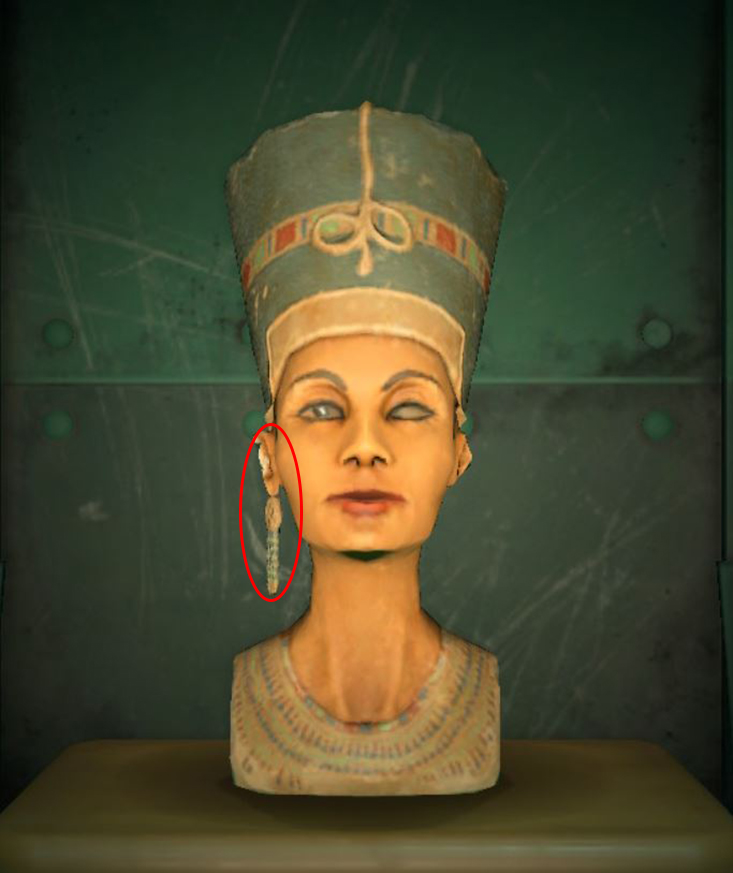
Mystic Statue: Bust of Nefertiti by Thutmose.
The fake is wearing an earring.
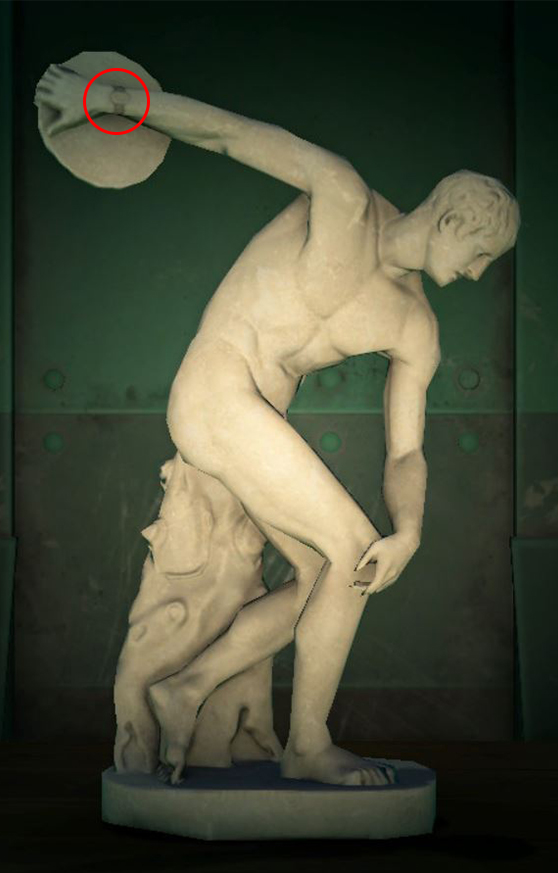
Robust Statue: The Discobolus of Myron.
The fake is wearing a watch on his throwing arm.

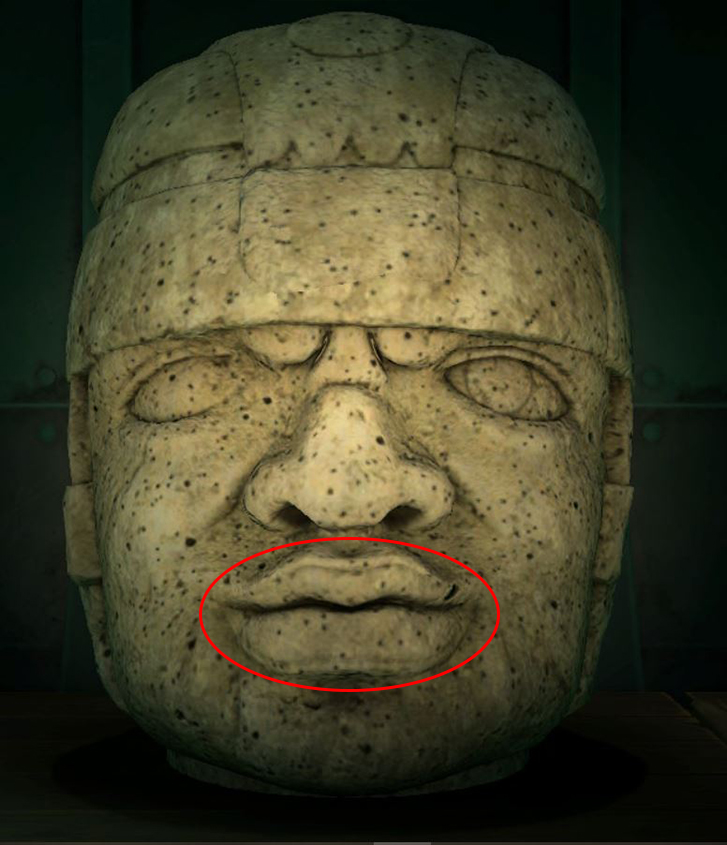
Rock-Head Statue: Olmec Colossal Head by Unknown.
The fake is smiling.

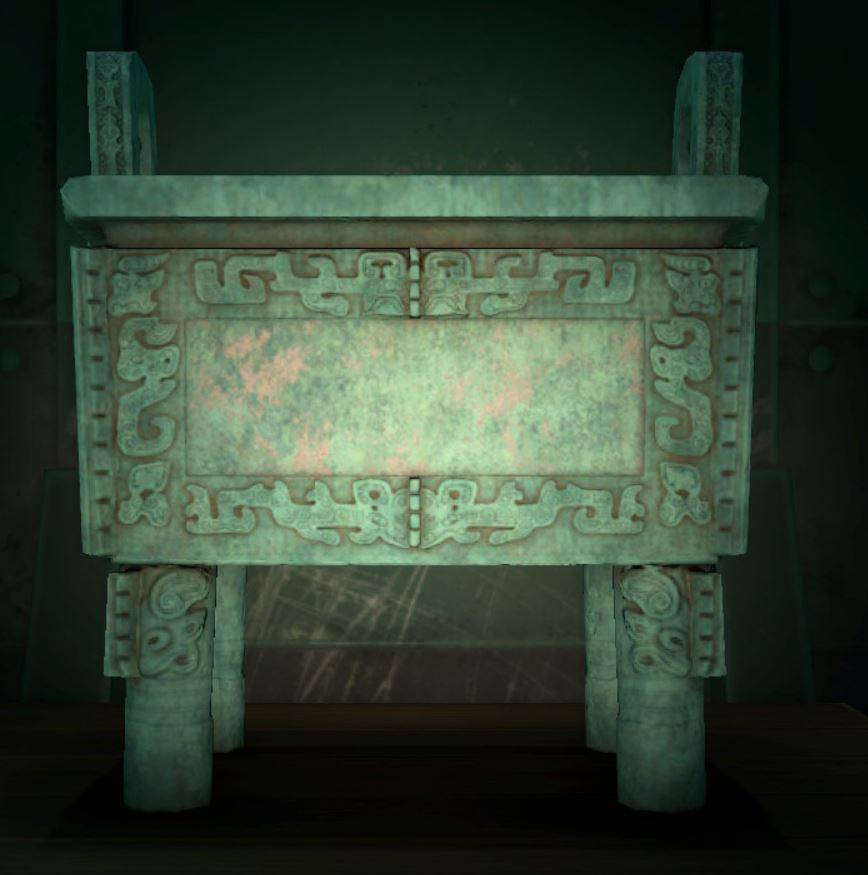
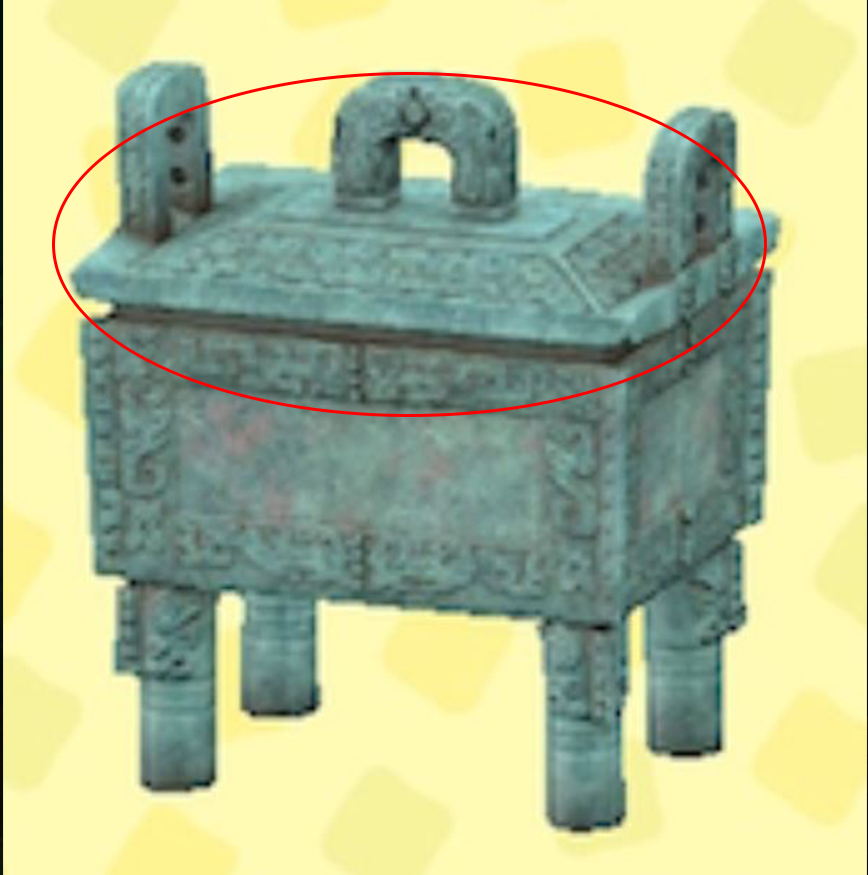
Tremendous Statue: Houmuwu Ding by Unknown.
The fake has a lid.
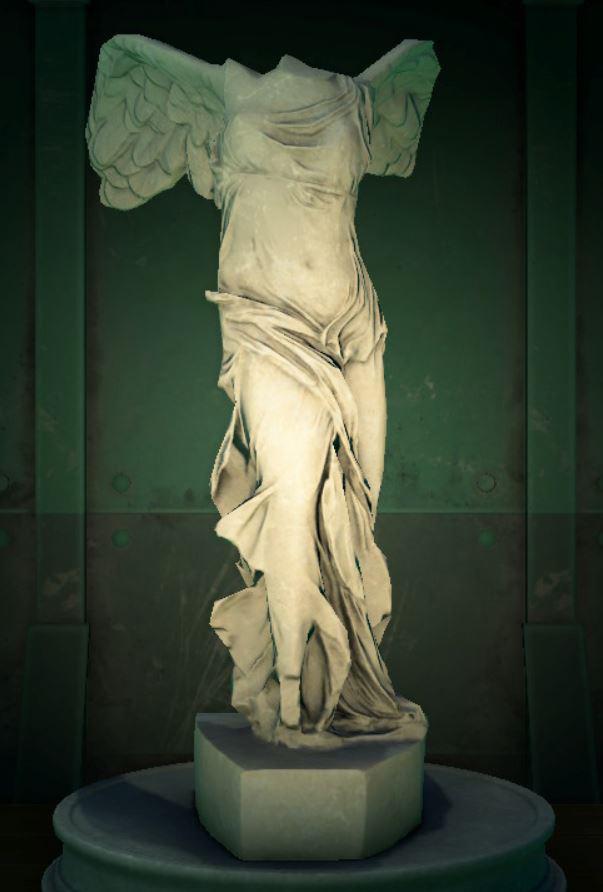
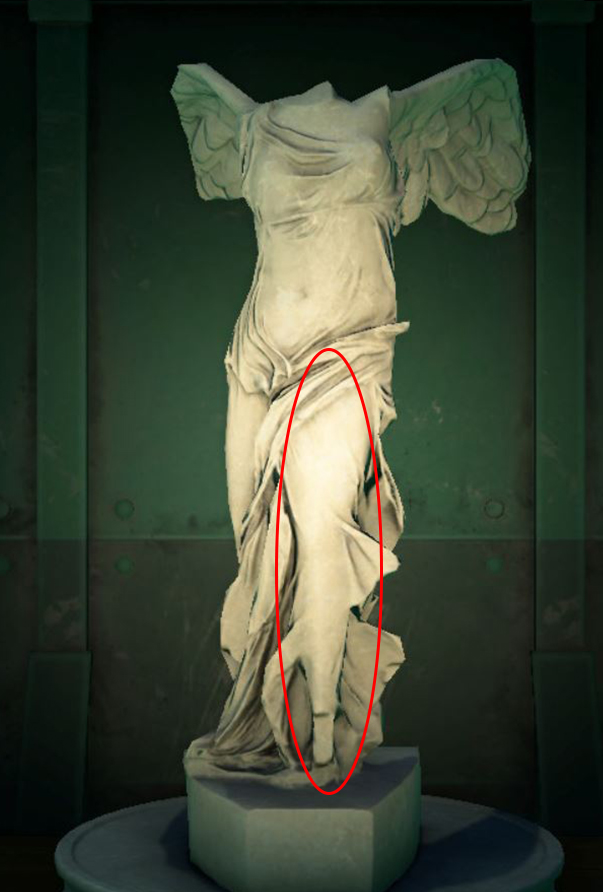
Valiant Statue: Nike of Samothrace by Unknown.
The fake has the figure’s left leg forward.
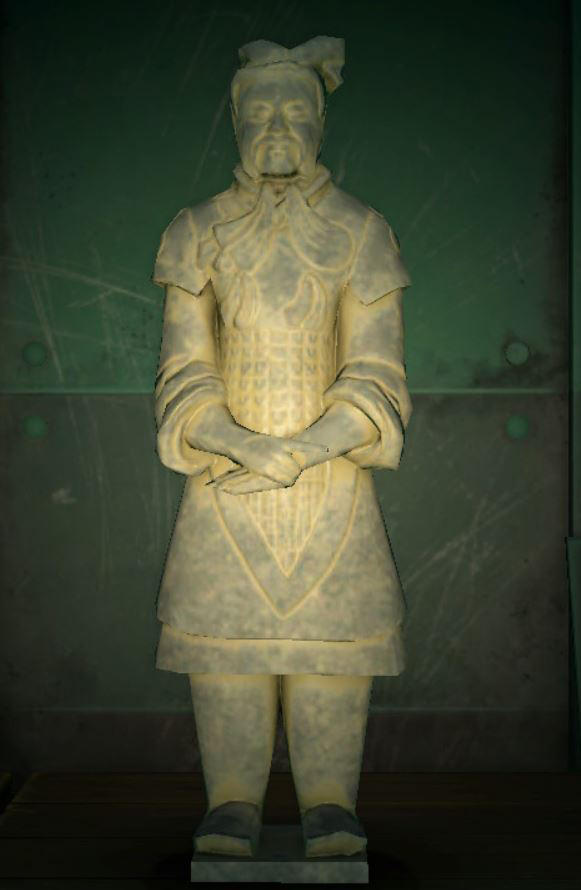
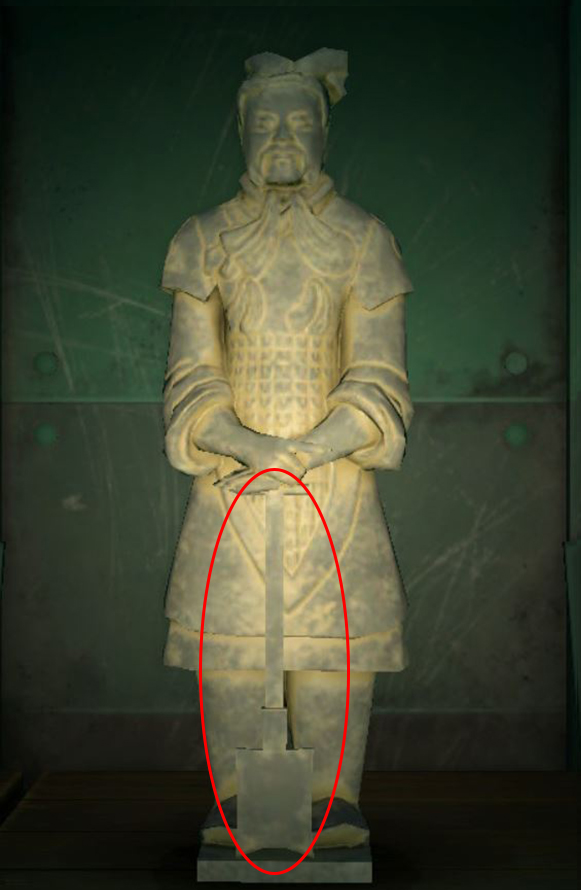
Warrior Statue: Emperor Qinshihuang’s Terracotta Army.
The fake is holding a shovel.
Resident Evil 3 Remake
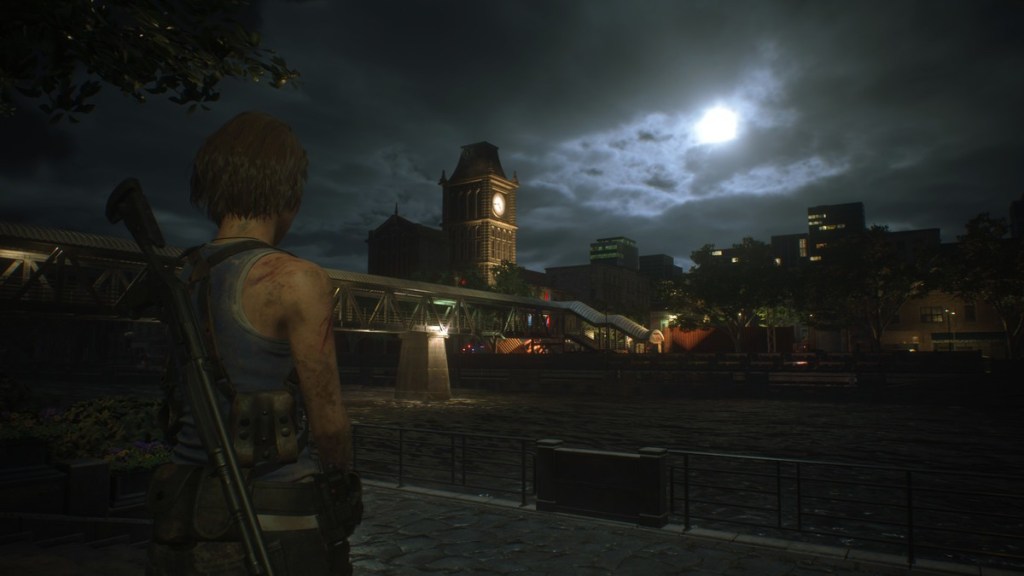
The first Resident Evil 3: Nemesis was released in 1999 when I was 9 years old. I was (ok maybe still am) too scared to play it, but I loved watching my stepdad play it. To this day, I’ll still look up and watch walkthroughs of the Resident Evil games. The first remake is my favorite by far, and it had been a long time coming for Capcom to also remake 2 and 3. The other 2 games deserve their own post, and I’m probably working backwards here starting with 3, but since it’s the most recently released I’m the most excited to talk about it right now. I’ve watched through the remake a couple of times now…I won’t lie here I’m too scared to play it! There’s some things that I really love and was so excited about in the remake, then there’s some things that I didn’t love as much.
Character designs
First off, Jill looks beautiful in this game! She looks like a real person, and I love that they gave her more attitude. With that being said though, she isn’t recognizable to me as Jill Valentine. Without her haircut and blue top, I wouldn’t know who that is supposed to be. Throughout the more modern Resident Evil games, Jill has a really similar look and translates between each game. Here, they gave her a completely new face and features. She’s pretty, but I don’t know why they didn’t make her look more like herself. She’s far from looking the the Jill in the original Nemesis, but I didn’t want her to look like that Jill anyway. Ever since the first Resident Evil was remade and Jill’s look was updated, it seems like that’s the look Capcom has been going with with any other installments in the franchise. That’s the Jill I’ve come to know.

You can seen here that Jill looks similar in each game. Even with the long blonde hair in the last picture, it still looks like her face.

Here, she looks completely different to me. I don’t see it as a negative, but the part of me that’s so nostalgic wanted her to look more like the Jill that I’m so familiar with.
Another thing that I noticed was her outfit. In the original, she was wearing a blue strapless top, a black skirt, and brown boots. Now she’s wearing a blue tank top, black pants, and black boots. Her outfit is definitely more practical for an apocalypse this time around, but at the same time I wanted to see her as she was in the original. I always interpreted her outfit as something she just happened to be wearing that day, but then shit happens and she just has to get going. No one really has time to change when shit hits the fan. Practical as her new outfit may be, it doesn’t seem like a very fun cosplay outfit. To be fair, you can get a costume of her original outfit, so I’m really glad that they included that, but only if you pre-ordered the game, so that’s a little bit of a bummer. Speaking of her outfits though, once you beat the game, you are able to purchase her S.T.A.R.S. outfit, so that’s cool.


Here you can see someone’s modified Jill’s look to be closer to the original, and I love it! Towards the end you can see the new Nemesis as well.
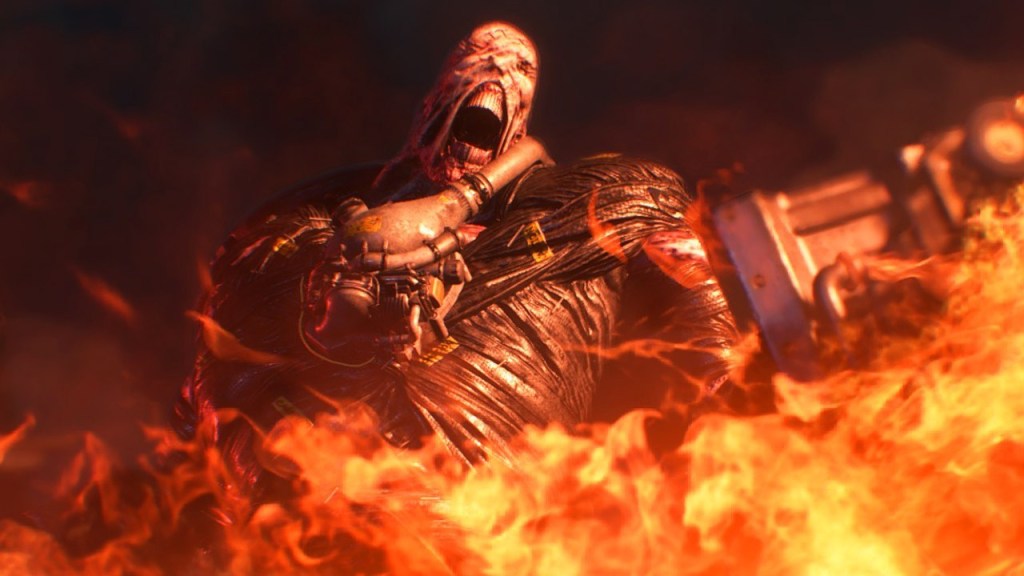
I didn’t hate the new look of Nemesis, I wasn’t too crazy about it either.
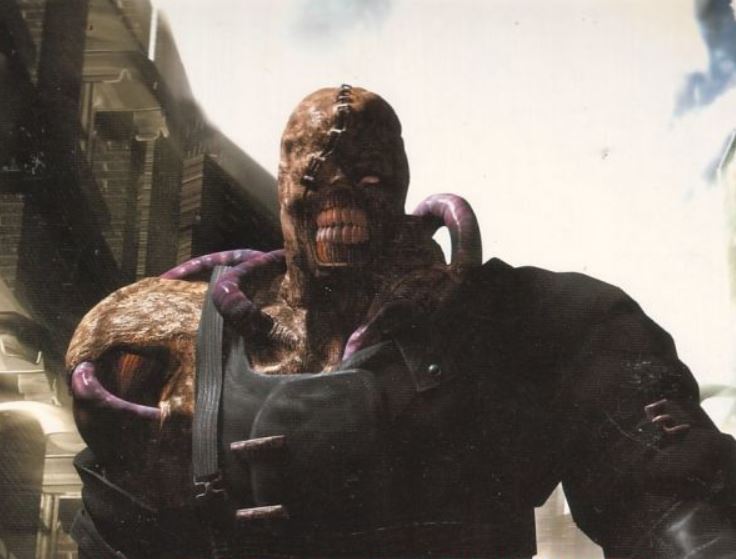
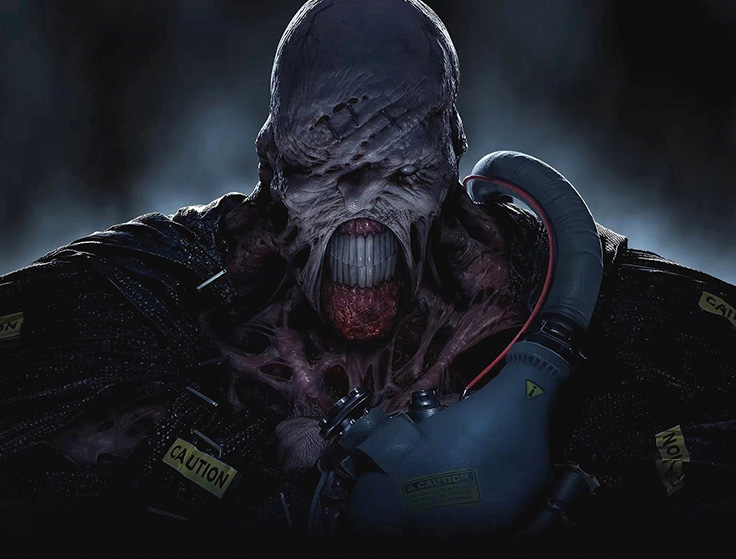
The first time I saw the new Nemesis, I immediately noticed his teeth. I don’t know if I’m alone in this, but I preferred his smaller, more pointed teeth from 99 over the pearly whites he has now. They’re so tall and skinny…I don’t know, I just don’t find them as intimidating. I’m also not a fan of his sideways nose, they also completely took away his neck. My husband said that he found the new design to be really terrifying, so maybe it’s just the 9 year old in me clinging to the monster that I knew.
Bro…where is your neck?!
As much as I kept feeling like Why would you make changes to these characters that I love?! when I saw how Carlos was updated, I loved it. I’m all for it. His original design was pretty bland and cookie cutter. Now he seems like a real person with his own unique look. I like how his hair is different; I like the texture and waves he has now. It does kind of look tall though, like maybe he used a blow dryer before coming into work that day lol. Is that just me?


Hey Carlos, holla at me with which hair products you’re using, thanks!


If you pre-ordered the game, Carlos has a ‘Classic’ costume, so if you’re more nostalgic like I tend to be, that’s cool to see, but again, a little bit of a bummer that it’s only for the pre-orders.
Differences
I knew going in that this was a Re-MAKE not a Re-MASTER. I knew that there would be some changes and not a shot-for-shot remake of the game that I knew. In some cases, I like the additions and changes, then there’s some things that I wish were included.
- No Alternate Endings
Depending on which choices you made throughout the game in the original, you would get a different ending. Some characters could live or die depending on you. This time around, the story is linear and only has one ending. - No Action Choices
When running into Nemesis, the original would pause these moments and give you two options, which in turn would leave the player to either fight or flee in each situation. Depending on what the player chose would lead to those alternate endings referenced above. - Brad
Brad dies in both games, but how he dies changes. In the remake, he gets bitten by zombies while protecting Jill. We do see him as a zombie later on outside the police station. We also see that he’s the one who bites and infects Marvin Branagh, the officer in Resident Evil 2 that helps you out but ends up turning. In the original, Brad is killed outside of the police station by Nemesis. Personally, I liked this change. I think I still would have preferred him to be killed by Nemesis, but seeing him come back and infect a familiar character was a nice way to tie the two games together. - No Clock Tower
This one bummed me out a bit. The Clock Tower was an iconic location in the original where you solved some puzzles and had one of your encounters with Nemesis. This is also the location that Jill got infected with the T-Virus in the original. Since you don’t go to the Clock Tower in the remake, Jill gets infected somewhere else. You can at least see the Clock Tower in the background at one point in the remake, but I really, really wish they would have just included it in the game. - Speaking of Jill’s infection…
In both games, Jill can thank Carlos for finding a vaccine for her. In the original, Carlos takes the infected Jill to a small chapel, where she can be safe while he goes to the hospital to find the vaccine. In the remake, Carlos has her lay in a bed at the hospital. In the grand scheme of things, the location change isn’t a huge deal, but I still felt bummed about it. - Grave Digger
After Jill heals up in the original, she goes through Raccoon Park and encounters the Grave Digger boss. This boss is completely left out of the remake. - Dead Factory
After the Grave Digger boss in the original, Jill then heads to the Dead Factory, which is where the player will have the final fight with Nemesis and escape from Raccoon City. The Dead Factory has been left out the remake, and Jill instead goes to Nest 2, a lab beneath Raccoon City. - Puzzles
One of the things I loved about the first few Resident Evils was the combination of feeling intensely scared merging with the calmer moments of solving puzzles. In this remake, there’s virtually no puzzle solving, especially since they chose to omit major locations in the game that had those puzzles that I remember. The flow of this remake is more action focused, and that give and take of exploration verses running for your life is lessened a lot for me.
samsies
So now for the things that they carried over in the remake that I was excited to see!
- Dario Rosso
Towards the beginning of the game, when you enter a warehouse, Jill sees Dario lock himself in a shipping container. In the Remake, if you approach the container and try to talk to him, he’ll say “I’m not going anywhere! I’d rather starve to death in here than be eaten by one of those undead monsters! Now leave me alone!“, which is the same quote and scenario in the original. - Nemesis Drops
Even though the remake doesn’t include the action choices when you run into Nemesis, you can still decide whether or not you want to fight him or flee. Like in the original, if you choose to fight him and he falls, he’ll drop some loot. You can take him down by either shooting the heart container on his chest a bunch, or with grenades. You can also use generators, which thankfully recharge, to give him a big shock, which in turn will give you some time to shoot his heart container.
The first time you encounter him, he’ll bust through a brick wall in the street. The first take down will reward you with the Extended Magazine, which will allow your handgun to carry 33 bullets at a time before needing to reload.
The second encounter will be near the Toy Uncle store. You’ll see Nemesis infect someone, and then he’ll be after you. After this take down, the next case will have the Handgun Moderator. This upgrade will reduce the noise from your handgun and increase the critical hit chance.
The third encounter will be at the subway station. If you choose to fight Nemesis here, this drop only has shotgun shells.
The next encounter will be back at the Toy Uncle store and Nemesis will destroy the head on top of the store. This time around, the case will have grenade launcher flame rounds.
As you can see, the things that excited me was a shorter list than the things that bummed me out 😦
Overall, the aesthetic looks great, it was nice to see a few ties to Resident Evil 2 (Marvin being one that was mentioned, and Jill running into Robert Kendo is one that was not…don’t want to spoil everything), but I feel like so much of the nostalgia was left out. I’m aware that better technology can allow better story telling and mechanics, and I like to see new approaches to the games so many of us grew up with and loved. But I don’t think it was a good call to leave out as much as they did. The thing that makes revisiting these worlds so exciting is getting to see the places that we remember 20 years ago, and getting to see them in HD! But then you get there and find out that you don’t get to see the things you were hoping to see…just kind of a bummer ![]()
Having said that, I do still like the game, I don’t think it’s a bad game, and I do think that I’ll revisit it one day. I do think, however, that the first was better.
Animal Crossing: New Horizons, Intro and Prices for Fish and Bugs
I’ve put about 75 hours into this cute little game so far, and it’s a pretty great game to keep me occupied during the quarantine. I’ve been playing least a couple of hours every day since it’s release on March 20th, just doing the basic shaking trees and hitting rocks for my fruits and crafting items.
From what I remember when playing Animal Crossing on the GameCube, the most that you were allowed to customize was the items within your house. The game has really come a long way since then! The look stays true to the original, but is more smooth, vast, and beautiful to look at. Not only can you customize the interior of your home, but the whole island that you live on as well.
One new feature of the game includes DIY recipes, which you can buy, find, and be given to by other residents of your island. You can use the recipes to build things like furniture and decorations, and you can take it one step further and customize most items to be a different color or pattern. I used a few of my customization kits to make the furniture in my bedroom match, and I also looked up and used a few QR codes from other players that made some designs. The cat pattern is my favorite find so far 🙂
So for this post I’ll focus on prices for bugs and fish. Check it out below so you can work your way towards the big house 🙂
Sell high priced bugs to flick
Flick is a red chameleon in a black vest and he carries a black, spiked bug net. He’ll visit your town randomly throughout the year, but he buys any of your bugs at 1.5 times the prices you can sell them for at Nook’s. Personally, I’ll go ahead and sell the lower priced bugs at Nook’s as I go, but if I catch something that’s worth-while, like a tarantula, I’ll put it in my home’s inventory until Flick visits again and make some bank on what I’ve been hoarding.
I made a list below of all the bugs in the game from the most valuable to the least. They’re listed by the price you can get them at Nook’s (remember that their value is 1.5 times more if you sell them to Flick), location, time, months available, and by which hemisphere you live in, NH for Northern and SH for Southern.
Name
Price
Location
Time, Months, and Hemisphere
Golden Stag
12,000
On Coconut Trees
5PM-8AM, Jul-Aug (NH)
5PM-8AM, Jan-Feb (SH)
Giraffe Stag
12,000
On Coconut Trees
5PM-8AM, Jul-Aug (NH)
5PM-8AM, Jan-Feb (SH)
Horned Hercules
12,000
On Coconut Trees
5PM-8AM, Jul-Aug (NH)
5PM-8AM, Jan-Feb (SH)
Scarab Beetle
10,000
On Trees
11PM-8AM, Jul-Aug (NH)
11PM-8AM, Jan-Feb (SH)
Giant Stag
10,000
On Trees
11PM-8AM, Jul-Aug (NH)
11PM-8AM, Jan-Feb (SH)
Cyclommatus Stag
8,000
On Coconut Trees
5PM-8AM, Jul-Aug (NH)
5PM-8AM, Jan-Feb (SH)
Scorpion
8,000
Ground
7PM-4AM, May-Oct (NH)
7PM-4AM, Nov-Apr (SH)
Tarantula
8,000
Ground
7PM-4AM, Nov-Apr (NH)
7PM-4AM, May-Oct (SH)
Horned Elephant
8,000
On Coconut Trees
5PM-8AM, Jul-Aug (NH)
5PM-8AM, Jan-Feb (SH)
Horned Atlas
8,000
On Coconut Trees
5PM-8AM, Jul-Aug (NH)
5PM-8AM, Jan-Feb (SH)
Goliath Beetle
8,000
On Coconut Trees
5PM-8AM, Jun-Sept (NH)
5PM-8AM, Dec-Mar (SH)
Rainbow Stag
6,000
On Trees
7PM-8AM, Jun-Sept (NH)
7PM-8AM, Dec-Mar (SH)
Banded Butterfly
4,500
Flying
8AM-5PM, May-Oct (NH)
8AM-5PM, Nov-Apr (SH)
Emperor Butterfly
4,000
Flying
5PM-8AM, Dec-Mar, Jul-Oct (NH)
5AM-8AM, Dec-Mar, Jun-Sept (SH)
Queen Alenxandria’s Birdwing
4,000
Flying
8AM-4PM, May-Sept(NH)
8AM-4PM, Nov-Mar (SH)
Agrias Butterfly
3,000
Flying
8AM-5PM, Apr-Sept(NH)
8AM-5PM, Oct-Mar (SH)
Great Purple Emperor
3,000
Flying
4AM-7PM, May-Aug(NH)
4AM-7PM, Oct-Mar (SH)
Atlas Moth
3,000
On Trees
7PM-4AM, April-Sept (NH)
7PM-4AM, Oct-Mar (SH)
Rosalia Batesi Beetle
3,000
On Tree Stumps
All Day, May-Sept (NH)
All Day, Nov-Mar (SH)
Dung Beetle
3,000
Ground
All Day, Dec-Feb (NH)
All Day, Jun-Aug (SH)
Rajah Brooke’s Birdwing
2,500
Flying
8AM-5PM, Dec-Feb and Apr-Sept (NH)
8AM-5PM, Oct-Mar and Jun-Aug (SH)
Madagascan Sunset Moth
2,500
Flying
8AM-4PM, May-Oct (NH)
8AM-4PM, Oct-Mar (SH)
Peacock Butterfly
2,500
Flying by Hybrid Flowers
4AM-7PM, Mar-Jun (NH)
4AM-7PM, Sept-Dec (SH)
Wasp
2,500
Shaking Trees
All Day, Jan-Dec (NH)
All Day, Jan-Dec (SH)
Jewel Beetle
2,400
On Tree Stumps
All Day, Apr-Aug (NH)
All Day, Oct-Feb (SH)
Orchid Mantis
2,400
On White Flowers
8AM-5PM, Mar-Nov (NH)
8AM-5PM, Sept-May (SH)
Giant Water Bug
2,000
On Ponds and Rivers
7PM-4AM, Apr-Sept (NH)
7PM-4AM, Oct-Mar (SH)
Saw Stag
2,000
On Trees
All Day, Jul-Aug (NH)
All Day, Jan-Feb (SH)
Tiger Beetle
1,500
Ground
All Day, Feb-Oct (NH)
All Day, Aug- Apr(SH)
Horned Dynastid
1,350
On Trees
5PM-8AM, Jul-Aug (NH)
5PM-8AM, Jan-Feb (SH)
Paper Kite Butterfly
1,000
Flying
8AM-7PM, Jan-Dec (NH)
8AM-7PM, Jan-Dec (SH)
Miyama Stag
1,000
On Trees
All Day, Jul-Aug (NH)
All Day, Jan-Feb (SH)
Man-Faced Stink Bug
1,000
On Flowers
7PM-8AM, Mar-Oct (NH)
7PM-8AM, Sept-Apr (SH)
Hermit Crab
1,000
On the Beach Disguised as Shells
7PM-8AM, Jan-Dec (NH)
7PM-8AM, Jan-Dec (SH)
Diving Beetle
800
On Ponds and Rivers
8AM-7PM, May-Sept (NH)
8AM-7PM, Nov-Mar (SH)
Blue Weevil Beetle
800
On Coconut Trees
All Day, Jul-Aug (NH)
All Day, Jan-Feb (SH)
Walking Leaf
600
Under Trees Disguised as Leaves
All Day, July-Sept (NH)
All Day, Jan-Mar (SH)
Walking Stick
600
On Trees
4AM-8AM and 5PM-7PM, Jul-Nov (NH)
4AM-8AM and 5PM-7PM, Jan-May (SH)
Migratory Locust
600
Ground
8AM-7PM, Aug-Nov (NH)
8AM-7PM, Feb-May (SH)
Bagworm
600
Shaking Trees
All Day, Jan-Dec (NH)
All Day, Jan-Dec (SH)
Evening Cicada
550
On Trees
4AM-8AM and 4PM-7AM, Jul-Aug (NH)
4AM-8AM and 4PM-7AM, Jan-Feb (SH)
Giant Cicada
500
On Trees
8AM-5PM, Jul-Aug (NH)
8AM-5PM, Jan-Feb (SH)
Damselfly
500
Flying
All Day, Nov-Feb (NH)
All Day, May-Aug (SH)
Mole Cricket
500
Underground
All Day, Nov-May (NH)
All Day, May-Nov (SH)
Spider
480
Shaking Trees
7PM-8AM, Jan-Dec (NH)
7PM-8AM, Jan-Dec (SH)
Violin Beetle
450
On Tree Stumps
All Day, May-June and Sept-Nov (NH)
All Day, Mar-May and Nov-Dec (SH)
Bell Cricket
430
Ground
7PM-8AM, Sept-Oct (NH)
7PM-8AM, Mar-Apr (SH)
Mantis
430
On Flowers
8AM-5PM, Mar-Nov (NH)
8AM-5PM, Sept-May (SH)
Water Cicada
400
On Flowers
8AM-5PM, Aug-Sept (NH)
8AM-5PM, Feb-Mar(SH)
Citrus Long-Horned Beetle
350
On Tree Stumps
All Day, Jan-Dec (NH)
All Day, Jan-Dec (SH)
Firefly
300
Flying
7PM-4AM, June (NH)
7PM-4AM, Dec (SH)
Robust Cicada
300
On Trees
8AM-5PM, July-Aug (NH)
8AM-5PM, Jan-Feb (SH)
Common Bluebottle
300
Flying
4AM-7PM, Apr-Aug (NH)
4AM-7PM, Oct-Feb (SH)
Earth-Boring Dung Beetle
300
Ground
All Day, July-Sept (NH)
All Day, Jan-Mar (SH)
Centipede
300
Hitting Rocks
4PM-11AM, Sept-June (NH)
4PM-11AM, Mar-Dec (SH)
Pill Bug
250
Hitting Rocks
11PM-4AM, Sept-June (NH)
11PM-4AM, Mar-Dec (SH)
Snail
250
On Rocks During Rain
All Day, Jan-Dec (NH)
All Day, Jan-Dec (SH)
Brown Cicada
250
On Trees
8AM-5PM, Jul-Aug (NH)
8AM-5PM, Jan-Feb (SH)
Tiger Butterfly
240
Flying
4AM-7PM, Mar-Sept (NH)
4AM-7PM, Sept-Mar (SH)
Darner Butterfly
230
Flying
8AM-5PM, Apr-Oct (NH)
8AM-5PM, Oct-Apr (SH)
Honeybee
200
Flying
8AM-5PM, Mar-July (NH)
8AM-5PM, Sept-Jan (SH)
Long Locust
200
Ground
8AM-7PM, Apr-Nov (NH)
8AM-7PM, Oct-May (SH)
Drone Beetle
200
On Trees
All Day, Jun-Sept (NH)
All Day, Dec-Feb (SH)
Ladybug
200
On Flowers
8AM-5PM, Mar-Jun and Oct (NH)
8AM-5PM, April and Sept-Dec (SH)
Wharf Roach
200
On Beach Rocks
All Day, Jan-Dec (NH)
All Day, Jan-Dec (SH)
Red Dragonfly
180
Flying
8AM-7PM, Sept-Oct (NH)
8AM-7PM, Mar-Apr (SH)
Rice Grasshopper
160
Ground
8AM-7PM, Aug-Nov (NH)
8AM-7PM, Feb-May (SH)
Grasshopper
160
Ground
8AM-5PM, July-Sept (NH)
8AM-5PM, Jan-Mar (SH)
Common Butterfly
160
Flying
4AM-7PM, Sept-Jun (NH)
4AM-7PM, Mar-Dec (SH)
Yellow Butterfly
160
Flying
4AM-7PM, Mar-Jun and Sept-Oct (NH)
4AM-7PM, Mar-Apr and Sept-Dec (SH)
Monarch Butterfly
160
Flying
4AM-5PM, Sept-Nov (NH)
4AM-5PM, Mar-May (SH)
Mosquito
130
Flying
5PM-4AM, Jun-Sept (NH)
5PM-4AM, Dec-Mar (SH)
Cricket
130
Ground
5PM-8AM, Sept-Nov (NH)
5PM-8AM, Mar-May (SH)
Pondskater
130
On Ponds and Rivers
8AM-7PM, May-Sept (NH)
8AM-7PM, Nov-Mar (SH)
Moth
130
Flies Near Lights
7PM-4AM, Jan-Dec (NH)
7PM-4AM, Jan-Dec (SH)
Stinkbug
120
On Flowers
All Day, Mar-Oct (NH)
All Day, Sept-Apr (SH)
Ant
80
On Rotten Food
All Day, Jan-Dec (NH)
All Day, Jan-Dec (SH)
Flea
70
Villager’s Heads
All Day, Apr-Nov (NH)
All Day, Oct-May (SH)
Fly
60
On Trash
All Day, Jan-Dec (NH)
All Day, Jan-Dec (SH)
Cicada Shell
60
On Trees
All Day, Jul-Aug (NH)
All Day, Jan-Feb (SH)
Sell High Priced Fish to C.J.
This method is the same as selling bugs to Flick, except with fish. C.J. is a gray beaver with sunglasses and a black hat on top of his head, a yellow vest, and camouflage pants. Just like Flick, he’ll buy fish from you for 1.5 times more than you can sell them at Nook’s, so save your higher priced ones for when he makes his random visit to your town.
Just like above, I’ll share a list of every fish in the game from the most valuable to the least, as well as how much they sell for at Nook’s, location and size of each fish, times and months they show up, and which hemisphere they’ll show up in, NH for Northern and SH for Southern.
Name
Price
Location/Shadow Size
Time, Months, and Hemisphere
Golden Trout
15,000
Clifftop River/Medium
4PM-9AM, Mar-May and Sept-Nov (NH)
4PM-9AM, Mar-May and Sept-Nov (SH)
Stringfish
15,000
Clifftop River/Huge
4PM-9AM, Dec-Mar (NH)
4PM-9AM, June-Sept (SH)
Dorado
15,000
River/Very Large
4PM-9AM, June-Sept (NH)
4PM-9AM, Dec-Mar (SH)
Great White Shark
15,000
Sea/Huge with Fin
4PM-9AM, June-Sept (NH)
4PM-9AM, Dec-Mar (SH)
Barreleye
15,000
Sea/Medium
9PM-4AM, Jan-Dec (NH)
9PM-4AM, Jan-Dec (SH)
Coelacanth
15,000
Sea During Rain/Very Large
All Day, Jan-Dec (NH)
All Day, Jan-Dec (SH)
Whale Shark
13,000
Sea/Huge with Fin
All Day, June-Sept (NH)
All Day, Dec-Mar (SH)
Saw Shark
12,000
Sea/Huge with Fin
4PM-9AM, June-Sept (NH)
4PM-9AM, Dec-Mar (SH)
Arowana
10,000
River/Large
4PM-9AM, June-Sept (NH)
4PM-9AM, Dec-Mar (SH)
Arapaima
10,000
River/Huge
4PM-9AM, June-Sept (NH)
4PM-9AM, Dec-Mar (SH)
Napoleon Fish
10,000
Sea/Huge
4AM-9PM, Jul-Aug (NH)
4AM-9PM, Jan-Feb (SH)
Sturgeon
10,000
River Mouth/Huge
4PM-9AM, Sept-Feb (NH)
4PM-9AM, Mar-Sept (SH)
Blue Marlin
10,000
Pier/Huge
All Day, Nov-Apr and Jul-Sept (NH)
All Day, Jan-Mar and May-Oct (SH)
Oarfish
9,000
Sea/Huge
All Day, Dec-May (NH)
All Day, June-Nov (SH)
Hammerhead Shark
8,000
Sea/Huge with Fin
4PM-9AM, June-Sept (NH)
4PM-9AM, Dec-Mar (SH)
Tuna
7,000
Pier/Huge
All Day, June-Sept (NH)
All Day, May-Oct (SH)
Gar
6,000
Pond/Huge
4PM-9AM, June-Sept (NH)
4PM-9AM, Dec-Mar (SH)
Mahi-Mahi
6,000
Pier/Huge
All Day, May-Oct (NH)
All Day, Nov-Apr (SH)
Giant Snakehead
5,500
Pond/Very Large
9AM-4PM, June-Aug (NH)
9AM-4PM, Dec-Feb (SH)
Barred Knifejaw
5,000
Sea/Medium
All Day, Mar-Nov (NH)
All Day, Sept-May (SH)
Snapping Turtle
5,000
River/Medium
9PM-4AM, Apr-Oct (NH)
9PM-4AM, Oct-Apr (SH)
Blowfish
5,000
Sea/Medium
9PM-4AM, Nov-Feb (NH)
9PM-4AM, May-Aug (SH)
Giant Trevally
4,500
Pier/Very Large
All Day, May-Oct (NH)
All Day, Nov-Apr (SH)
Ranchu Goldfish
4,500
Pond/Tiny
9AM-4PM, Jan-Dec (NH)
9AM-4PM, Jan-Dec (SH)
Ocean Sunfish
4,000
Sea/Huge with Fin
4AM-9PM, Jul-Sept (NH)
4AM-9PM, Jan-Mar (SH)
Koi
4,000
Pond/Large
4PM-9AM, Jan-Dec (NH)
4PM-9AM, Jan-Dec (SH)
Saddled Bichir
4,000
River/Large
9PM-4AM, June-Sept (NH)
9PM-4AM, Dec-Mar (SH)
Char
3,800
River Clifftop/Medium
4PM-9AM, Mar-June and Sept-Nov (NH)
4PM-9AM, Mar-May and Sept-Dec (SH)
Soft-Shelled Turtle
3,750
River/Medium
4PM-9AM, Aug-Sept (NH)
4PM-9AM, Feb-Mar (SH)
Ray
3,000
Sea/Large
4AM-9PM, Aug-Nov (NH)
4AM-9PM, Feb-May (SH)
Angelfish
3,000
River/Tiny
4PM-9AM, June-Oct (NH)
4PM-9AM, Nov-Apr (SH)
Red Snapper
3,000
Sea/Medium
All Day, Jan-Dec (NH)
All Day, Jan-Dec (SH)
Betta
2,500
River/Small
9AM-4PM, May-Oct (NH)
9AM-4PM, Nov-Apr (SH)
Piranha
2,500
River/Small
9AM-4PM, June-Sept (NH)
9AM-4PM, Dec-Mar (SH)
Football Fish
2,500
Sea/Large
4PM-9AM, Nov-Mar (NH)
4PM-9AM,
Moray Eel
2,000
Sea/Long and Thin
All Day, Aug-Oct (NH)
All Day, Feb-Apr(SH)
Mitten Crab
2,000
River/Small
4PM-9AM, Sept-Nov (NH)
4PM-9AM, Mar-May (SH)
Pike
1,800
River/Very Large
All Day, Sept-Dec (NH)
All Day, Mar-June (SH)
King Salmon
1,800
River Mouth/Huge
All Day, Sept (NH)
All Day, March (SH)
Nibble Fish
1,500
River/Small
9AM-4PM, May-Sept (NH)
9AM-4PM, Dec-Mar (SH)
Sucker Fish
1,500
Sea/Huge with Fin
All Day, June-Sept (NH)
All Day, Dec-Mar (SH)
Goldfish
1,300
Pond/Tiny
All Day, Jan-Dec (NH)
All Day, Jan-Dec (SH)
Pop-Eyed Goldfish
1,300
Pond/Tiny
9AM-4PM, Jan-Dec (NH)
9AM-4PM, Jan-Dec (SH)
Guppy
1,300
River/Tiny
9AM-4PM, Apr-Nov (NH)
9AM-4PM, Oct-May (SH)
Seahorse
1,100
Sea/Tiny
All Day, Apr-Nov (NH)
All Day, Oct-May (SH)
Cherry Salmon
1,000
River Clifftop/Medium
4PM-9AM, Mar-June and Sept-Nov (NH)
4PM-9AM, Mar-May and Sept-Dec (SH)
Butterfly Fish
1,000
Sea/Small
All Day, Apr-Sept (NH)
All Day, Oct-Mar (SH)
Sea Butterfly
1,000
Sea/Tiny
All Day, Dec-Mar (NH)
All Day, June-Sept (NH)
Surgeonfish
1,000
Sea/Small
All Day, Apr-Sept (NH)
All Day, Oct-Mar (SH)
Bitterling
900
River/Tiny
All Day, Nov-Mar (NH)
All Day, May-Sept (SH)
Sweetfish
900
River/Medium
All Day, July-Sept (NH)
All Day, Jan-Mar (SH)
Rainbowfish
800
River/Tiny
9AM-4PM, May-Oct (NH)
9AM-4PM, Nov-Apr (SH)
Tilapia
800
River/Medium
All Day, June-Sept (NH)
All Day, Dec-Apr (SH)
Catfish
800
Pond/Large
4PM-9AM, May-Oct (NH)
4PM-9AM, Nov-Apr (SH)
Olive Flounder
800
Sea/Large
All Day, Jan-Dec (NH)
All Day, Jan-Dec (SH)
Salmon
700
River Mouth/Large
All Day, Sept (NH)
All Day, March (SH)
Clown Fish
650
Sea/Tiny
All Day, Apr-Sept (NH)
All Day, Oct-Mar (SH)
Ribbon Eel
600
Sea/Long and Thin
All Day, June-Oct (NH)
All Day, Dec-Apr (SH)
Zebra Turkeyfish
500
Sea/Medium
All Day, Apr-Nov (NH)
All Day, Oct-May (SH)
Squid
500
Sea/Medium
All Day, Dec-Aug (NH)
All Day, June-Feb (SH)
Neon Tetra
500
River/Tiny
All Day, Apr-Nov (NH)
All Day, Oct-May (SH)
Pond Smelt
500
River/Small
All Day, Dec-Feb (NH)
All Day, June-Aug (SH)
Freshwater Goby
400
River/Small
4PM-9AM, Jan-Dec (NH)
4PM-9AM, Jan-Dec (SH)
Loach
400
River/Small
4PM-9AM, Mar-May (NH)
4PM-9AM, Sept-Nov (SH)
Sea Bass
400
Sea/Large
All Day, Jan-Dec (NH)
All Day, Jan-Dec (SH)
Black Bass
320
River/Medium
All Day, Jan-Dec (NH)
All Day, Jan-Dec (SH)
Dab
300
Sea/Medium
All Day, Oct-Apr (NH)
All Day, Apr-Oct (SH)
Killifish
300
Pond/Tiny
All Day, Apr-Aug (NH)
All Day, Oct-Feb (SH)
Yellow Perch
300
River/Small
All Day, Oct-Mar (NH)
All Day, Apr-Sept (SH)
Carp
300
Pond/Large
All Day, Jan-Dec (NH)
All Day, Jan-Dec (SH)
Puffer Fish
250
Sea/Medium
All Day, Jul-Sept (NH)
All Day, Jan-Mar (SH)
Anchovy
200
Sea/Tiny
4AM-9PM, Jan-Dec (NH)
4AM-9PM, Jan-Dec (SH)
Pale Chub
200
River/Tiny
9AM-4PM, Jan-Dec (NH)
9AM-4PM, Jan-Dec (SH)
Crawfish
200
Pond/Small
All Day, Apr-Sept (NH)
All Day, Oct-Mar (SH)
Dace
192
River/Medium
4PM-9AM, Jan-Dec (NH)
4PM-9AM, Jan-Dec (SH)
Bluegill
180
River/Small
9AM,-4PM, Jan-Dec (NH)
9AM-4PM, Jan-Dec (SH)
Crucian Carp
160
River/Small
All Day, Jan-Dec (NH)
All Day, Jan-Dec (SH)
Horse Mackerel
150
Sea/Small
All Day, Jan-Dec (NH)
All Day, Jan-Dec (SH)
Frog
120
Pond/Small
All Day, May-Aug (NH)
All Day, Nov-Feb (SH)
Tadpole
100
Pond/Tiny
All Day, Mar-Jul (NH)
All Day, Sept-Jan (SH)
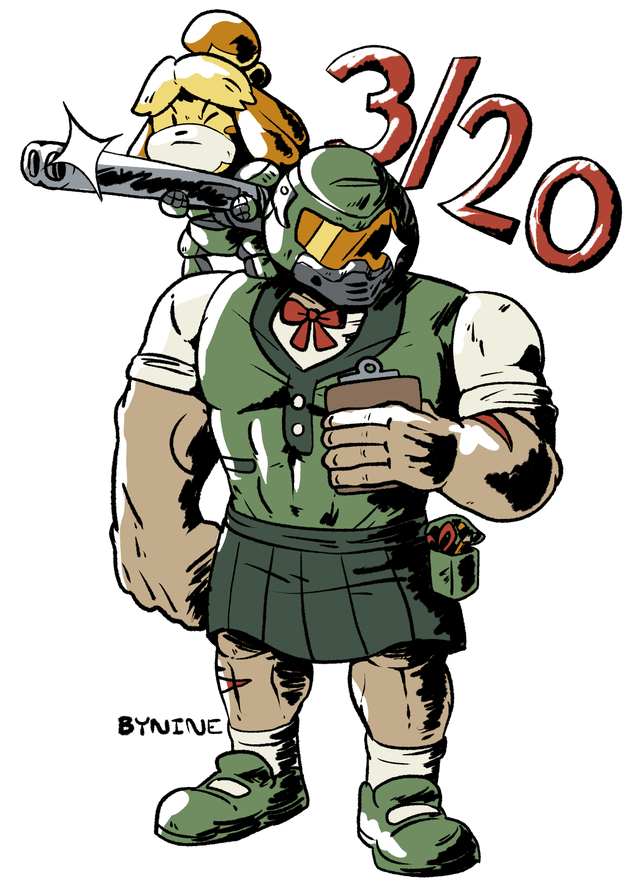
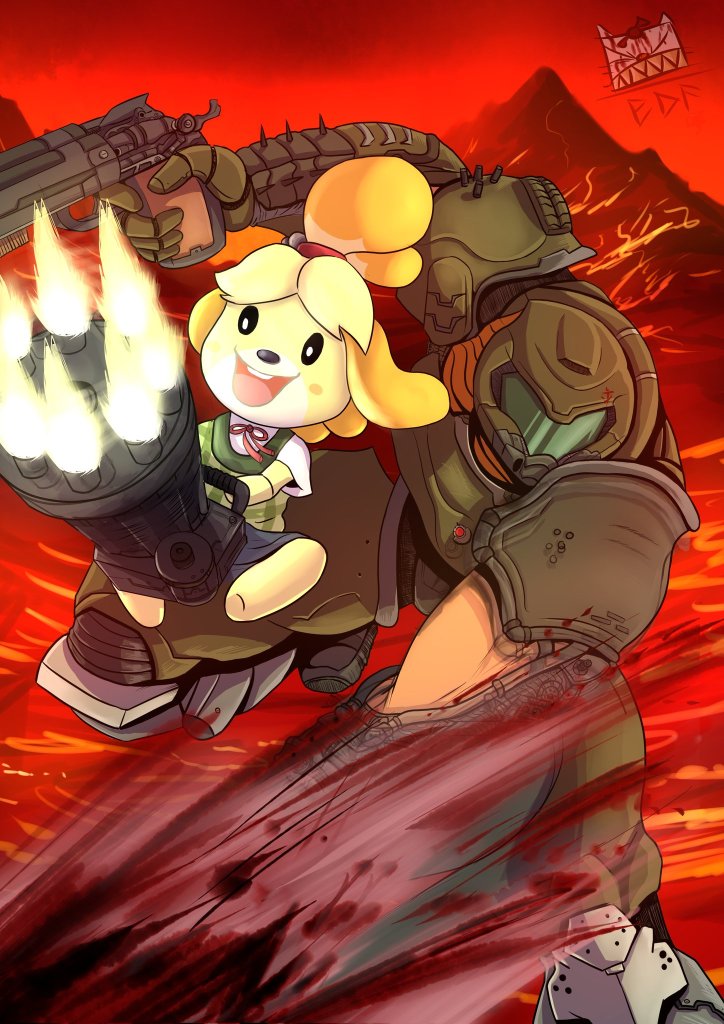
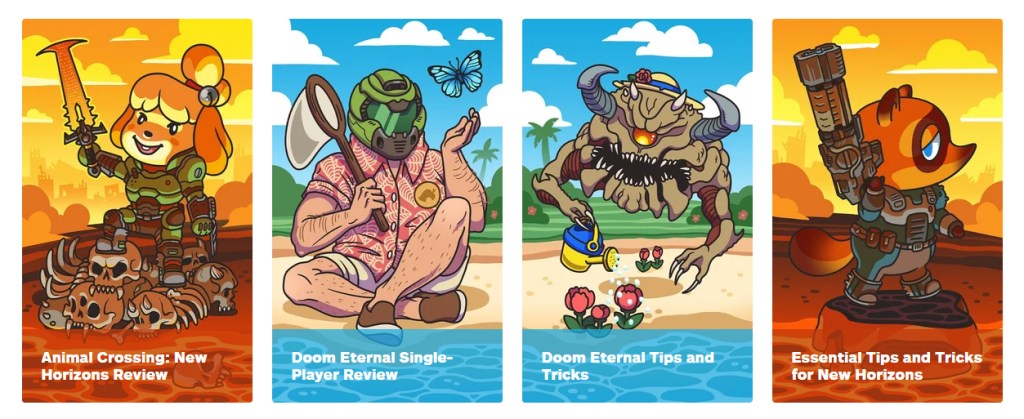
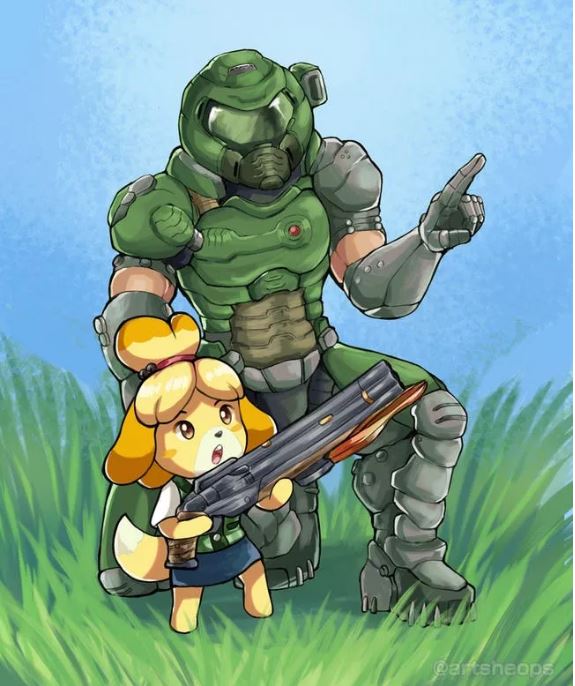
Doom and Animal Crossing
I came across this video on the internets and I had to share it!
Apparently there’s a big fan base of Animal Crossing and Doom crossover fan art, and this video is the first that I’ve seen of it. I haven’t had a chance to play Doom Eternal yet… but I plan on getting it soon and I have been tearing up some Animal Crossing: New Horizons for the past few days.
The games couldn’t be more different from each other. One is adorable, lighthearted, and easy-going while the other is over-the-top violent, aggressive, and metal. I’m a fan big fan of both games, and I’m really interested in seeing more of the crossovers for these.
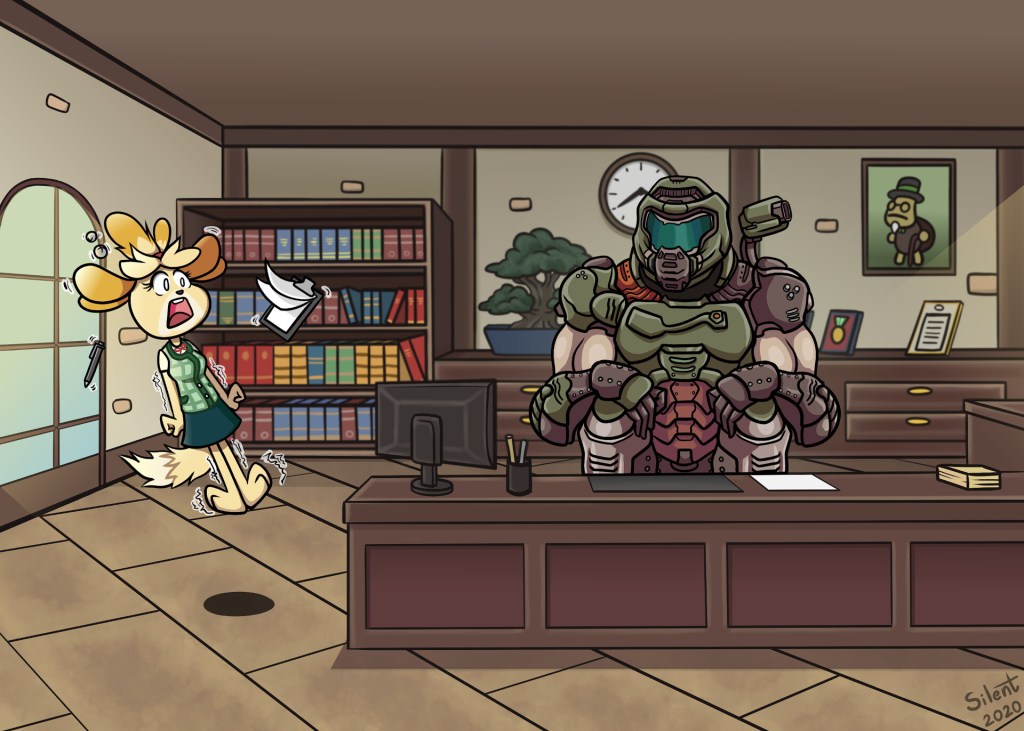
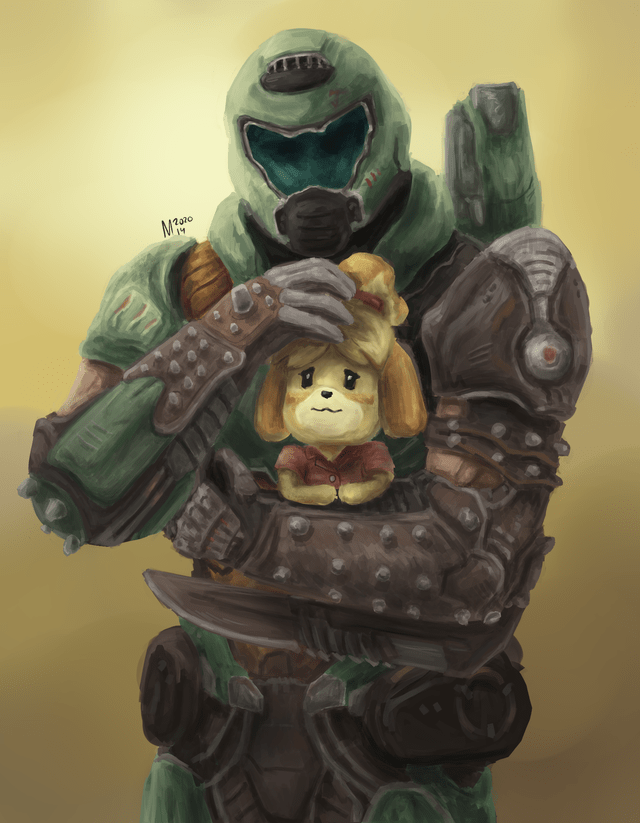
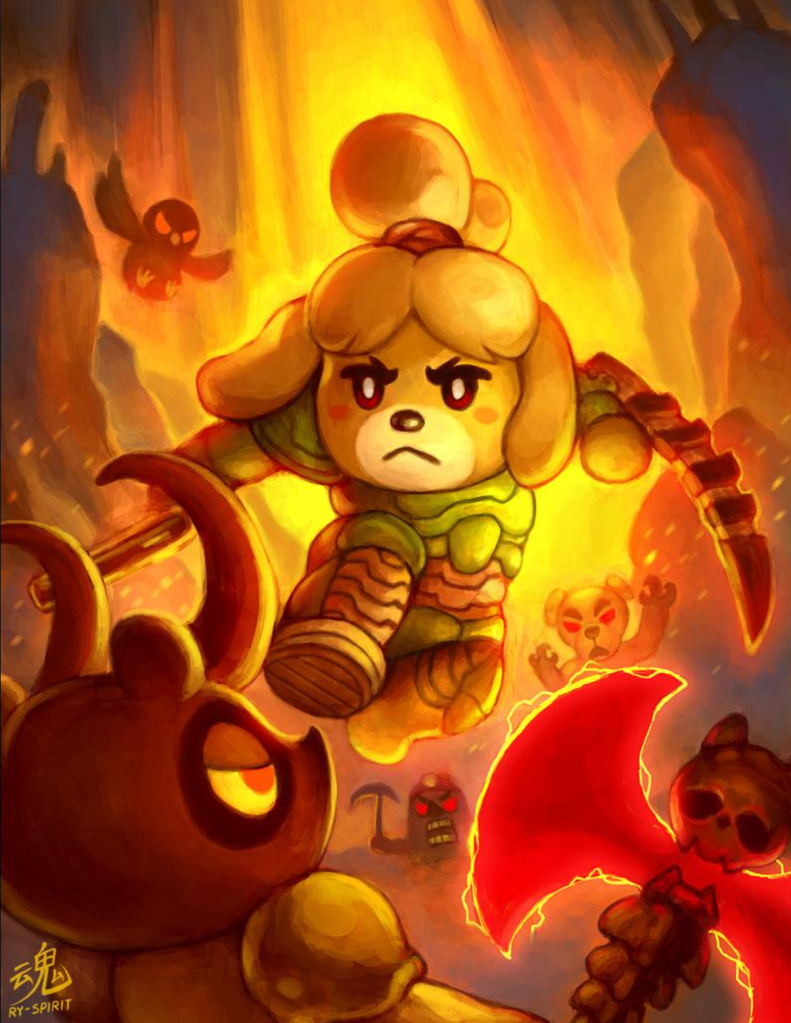
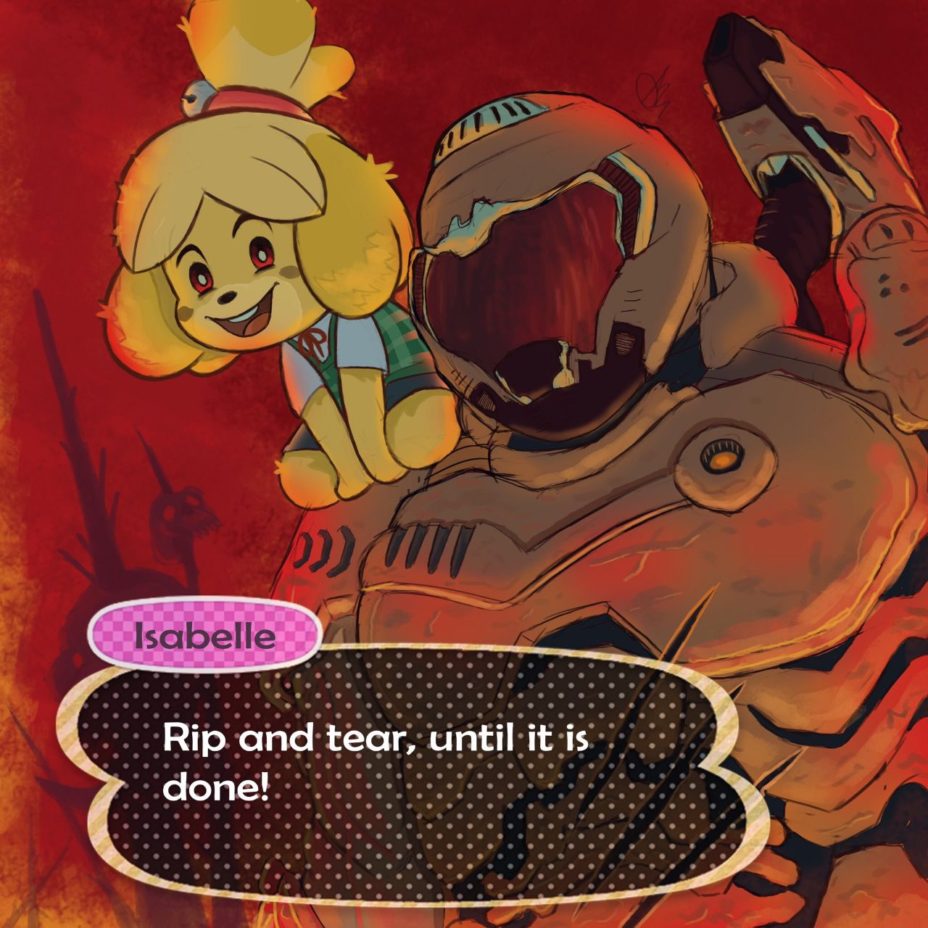
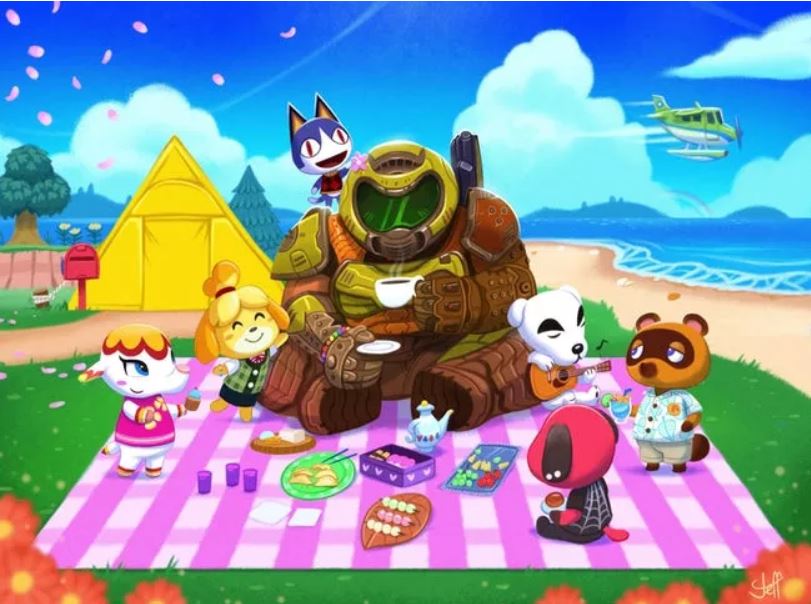
*Update
Here are some fan-made videos and art that I could find, enjoy! 🙂
I’d like to note that none of this artwork is mine, so I’ll try my best to link what I can to the real artists out there.
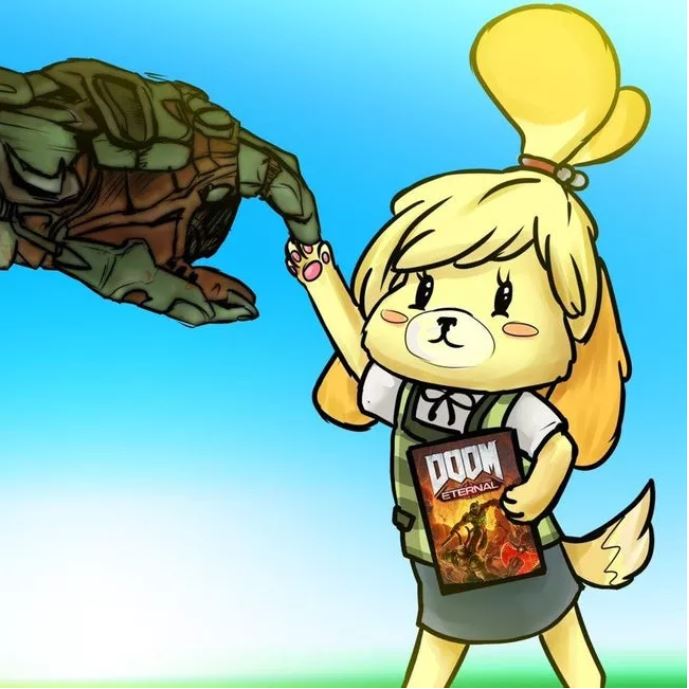
I’ll start with a video that I found explaining how this odd friendship between Doom Slayer and Isabelle started ❤


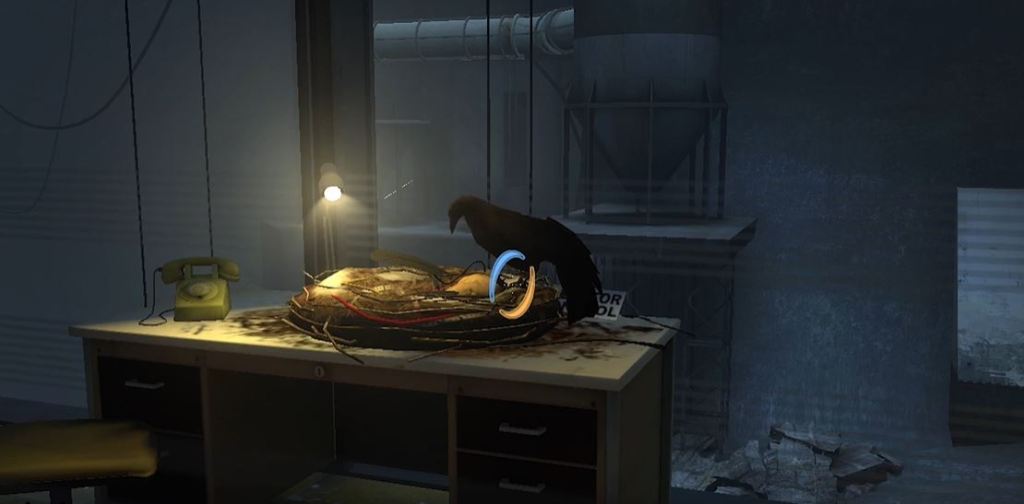
Portal 2 Easter Eggs and Spoilers
Ok, now that you know the whole Portal story, it’s time for the good stuff! SPOILERS! And there’s a lot of them to digest here so NOM NOM NOM NOM NOM
Here are my favorites!
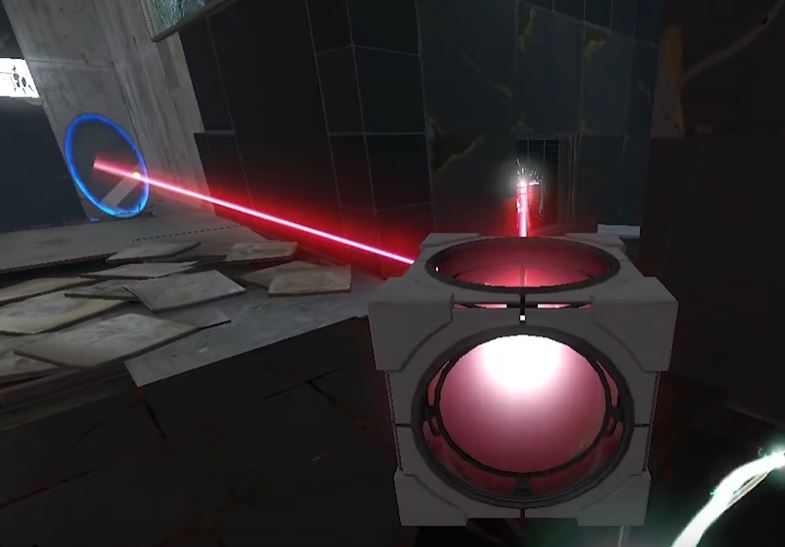
Singing Turrets
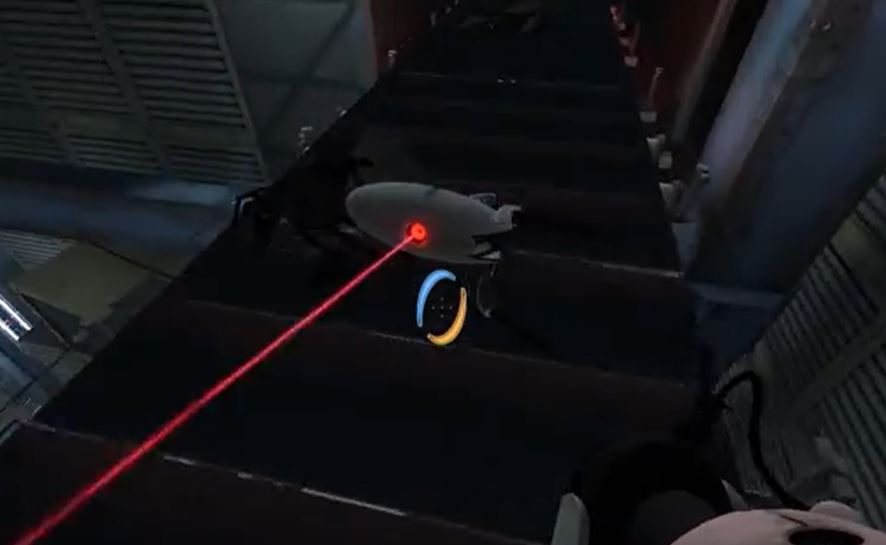
In Chapter 3, Chamber 16, you can find a Rat Den through a the grate a turret is behind. Use your portals to line up the laser in that direction and use a reflective cube to point the laser at the turret. The turret will blow up, as will the grate and give you access into the den.
There’s some Rattmann artwork to see here, but towards the right you can look down and see an adorable quartet of turrets singing to themselves. If you didn’t already know the ending, it gives you sneak peek that turrets like to sing ❤
You can see a video of the test chamber and hear the cute singing here.
Vitrified Doors
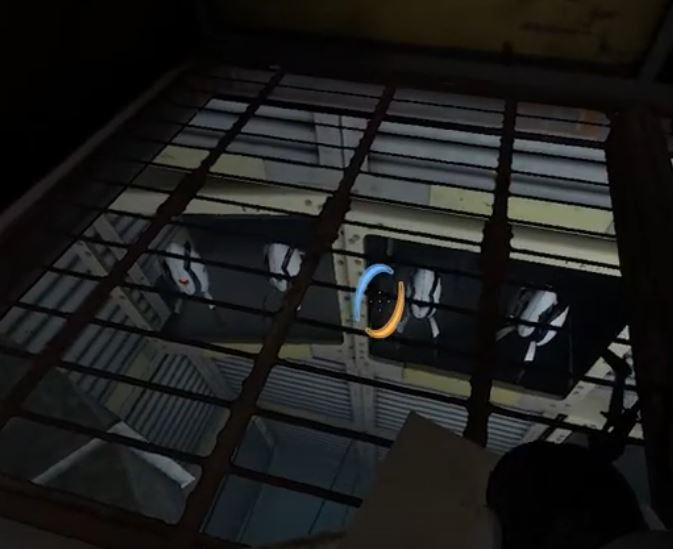
For the Door Prize achievement, you need to find six vitrified doors and listen to the audio clips next to them. The first three are towards the beginning of the chapter The Fall. After you soar through the Aperture logo, you’ll see a tall elevator emerging from some gross water. When you make your way up there, towards the left you can see the doors. Use portals to get over there and listen to those first three. You can see a video of the area and hear Cave’s hilarious recordings here.
For the last three doors, continue through the game for a bit until you get into the 1970s era of Aperture. You’ll see a building labeled Control Room in big yellow letters, and above it is a small office building, and that’s where you want to go to complete this achievement. When you get into the office, go to the back left corner. There’s a door partially blacked by a cabinet. Wiggle your way back there and you’ll find the last three doors, as can be seen here. You also find the achievement Ship Overboard back here, which I’ll follow up with next.
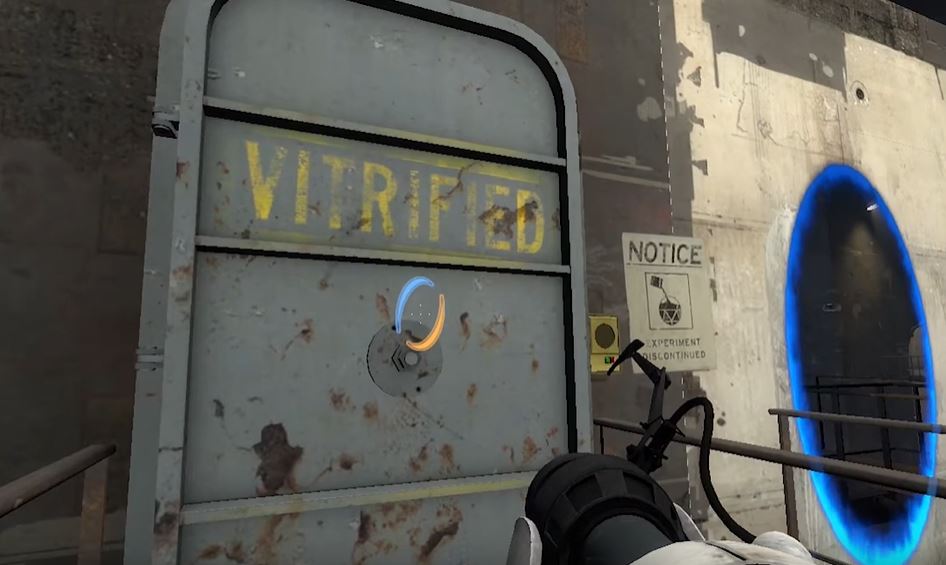
Ship Overboard ACHIEVEMENT
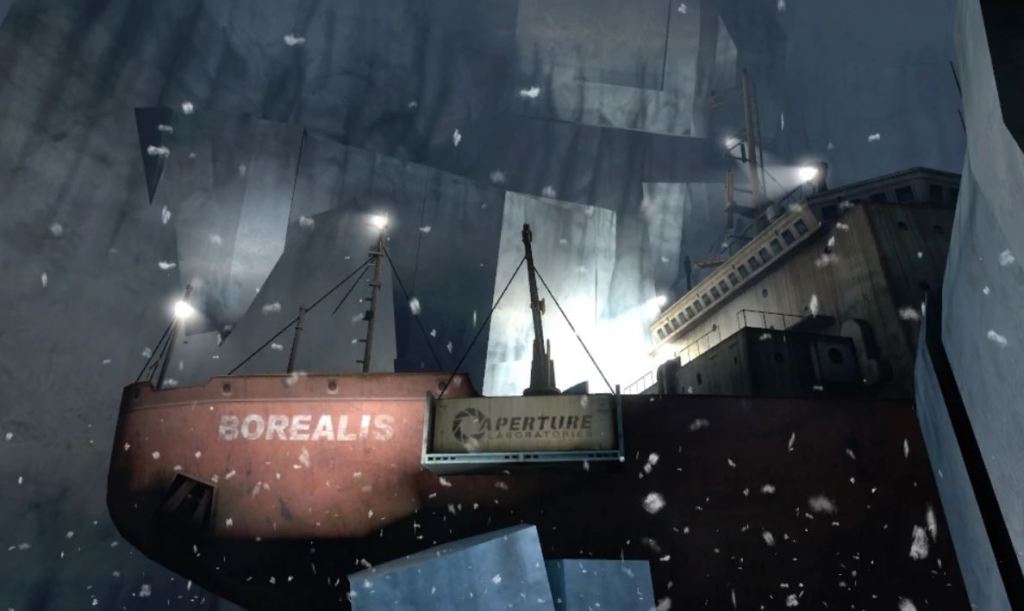
While you’re in the area, go to the back of this hidden hallway and to the right, one of the vitrified doors is busted open. Go in and you’ll be at a ship dock. Head to the left and go towards the life preserver labeled Borealis and you’ll get the achievement.
Beyond the achievement, this is an Eater Egg connecting the worlds of Portal and another one of Valve’s successful franchises, Half-Life. First off, why the hell is there a ship dock this far underground?? And what is the Borealis?
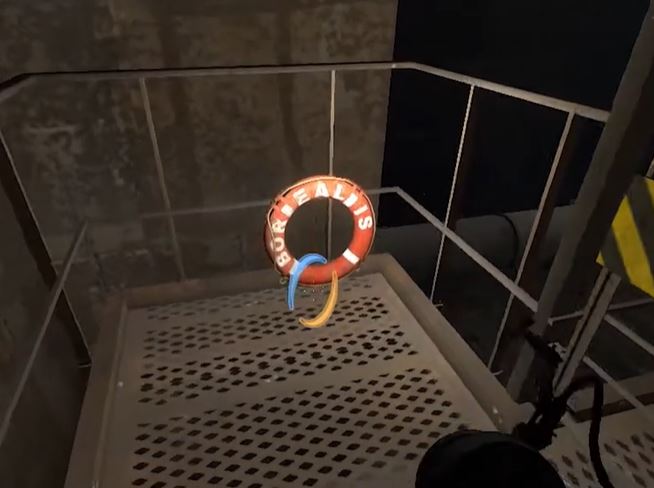
In the Portal/Half-Life universe, the Borealis is a legendary ship that was worked on at Aperture, only to mysteriously disappear one day. The Borealis is intorodiced in Half-Life 2: Episode 2 by scientist Isaac Kleiner. Isaac explains that the project aboard the Borealis was promising, but because Aperture was in constant competition with Half-Life’s company, Black Mesa, safety measures were overlooked and the project got out of control, causing the ship and even part of the dock to disappear. A common theory is that the project on the Borealis likely had to do with portals, but only more powerful and on a larger scale.
Final Transmission
In the first Portal, there’s an achievement ‘Transmission Received’, with a full walkthrough here. In Portal 2, there is a ‘Final Transmission’ achievement with one radio in Chamber 6. When GlaDOS clears out a bunch of garbage, there will be a radio. Grab it and take it to the Rat Den shown here.
The transmission can actually be decoded and you’ll see this image:
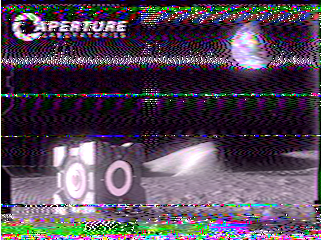
You can see that it’s a companion cube on the moon. Is it Rattmann’s companion cube? And did he take this picture on the moon??
prometheus
This is one of those spoilers that’s trickled throughout the whole game. You don’t even notice these details during your first playthrough, but then you read the spoiler and it seems much more obvious.
But first, learning time! The spoiler won’t mean much if you don’t know the story of Prometheus, and honestly, I had to brush up on Greek mythology myself for this.
Even though Prometheus was a Titan, he sided with Zeus in a war between Titans and Olympians. He chose to live around people rather than on Mount Olympus. He saw that people were cold and suffering, and because Zeus would not share fire with the people, Prometheus stole it. When Zeus found out, he was pissed. Zeus spared Prometheus from Tartarus (a part of the underworld where the worst criminals were banished and tortured) since he had helped the Olympians in the war, but he condemned Prometheus to an eternal torture of being chained to a mountain and have his liver (or heart, depending on where you’re reading the story) pecked apart every day, only to grow back over night so that it could be pecked again the next day. That’s better than Tartarus…I guess?

So, back to Portal 2.
During The Escape, you’ll see a turret (referred to as the Oracle Turret outside of the game) on the redemption line saying “I’m different”. If you choose to pick it up and save it, it will tell you a few things, but most importantly to this spoiler; “Prometheus was punished by the gods for giving the gift of knowledge to man. He was cast into the bowels of the Earth and pecked by birds.” Why does the Oracle Turret tell you this, and how does it correlate to the Portal 2 story? We can break it down and replace character names where needed: “Prometheus (GLaDOS) was punished by the gods (Wheatley) for giving the gift of knowledge (the Portal gun) to man (Chell). He was cast into the bowels of the Earth and pecked by birds.” During The Fall, Chell and GLaDOS fall 4200 meters, the same distance Prometheus fell when cast into the bowels of the Earth (the measurements can be see on the walls as you fall). As for the being pecked by birds? After you fall, you see GLaDOS being pecked by a bird and carried away. When you find GLaDOS later, she’s being pecked by the bird again. After the fall, you can see a large building labeled TARTAROS 09, another connection to the Prometheus story.
Though this detail isn’t tied directly to Prometheus’ story, it is another tie to Greek mythology…At the end of the game, after GLaDOS sends you up to the surface, Chell walks out to a field of wheat. In Greek mythology, the Elysian Fields is a paradise where heroes the gods gave immortality to lived. The wheat fields are just a simple nod to that paradise and is symbolic of Chell’s freedom.
Caroline and Cara Mia Addio
Ooooooh this is a juicy one, and a long one so buckle up.
To fully appreciate this spoiler, it’s important to know who Caroline really was. We can start at the beginning, with the founder and CEO of Aperture Science, Cave Johnson. Aperture Science has it’s own interesting history, it wasn’t even Aperture Science to begin with, but right here we’re more concerned on the Caroline connection.
Caroline worked as Cave’s personal assistant until he passed away in the 1980s. While Cave was terminally ill, he urged the scientists of Aperture to develop an AI that his consciousness could be transferred into. It was his dying wish that should he die before the technology was ready, that Caroline be the one who’s imported into the AI and run the Enrichment Center.
There are unused audio files you can find of Caroline saying in a scared tone “Mr Johnson, I don’t want this” and “No, listen to me. Sir I do not want this”. It’s clear that Caroline didn’t want to be uploaded into the AI, a recording of Cave even mentions that she would likely refuse. But clearly, she ended up there.
When GLaDOS (Genetic Lifeform and Disc Operating System) was activated, the AI was unstable, unleashing deadly neurotoxin into the facility each time she was activated. Somewhere along the line, GLaDOS lost access to her memory of Caroline, being completely unaware of her own origin. Even though she can’t remember Caroline, it’s possible that the violation and hatred she (Caroline) felt towards the scientists that went against her wishes and placed her into the AI could still manifest itself in GLaDOS. Maybe that’s why she wanted to kill everyone.

It’s highly implied that Caroline wasn’t just a personal assistant to Cave Johnson. Cave clearly holds her in high regard, and the relationship that he and Caroline had was likely a romantic one. Every portrait that you come across is only of Cave, except in the one Easter Egg/Achievement “Portrait of a Lady“, (seen above) where you see Cave with a woman. Nothing outright says that the woman is Caroline, but who else could it be?? Potato GLaDOS even says “Those people…in the painting…they look so familiar”. Cave wouldn’t of had just anyone in a painted portrait with him. It was the woman he loved, and the one he was the closest to. Of all the scientists and great minds that he had to choose from to run the facility in his stead, he chose her. And that speaks volumes! Not saying that Caroline wasn’t also brilliant, she was! But despite the fact that she didn’t want to be uploaded into an AI, Cave chose her as his successor, I believe, because he loved her. I don’t doubt that there could have been other competent scientists that would have offered to be GLaDOS.
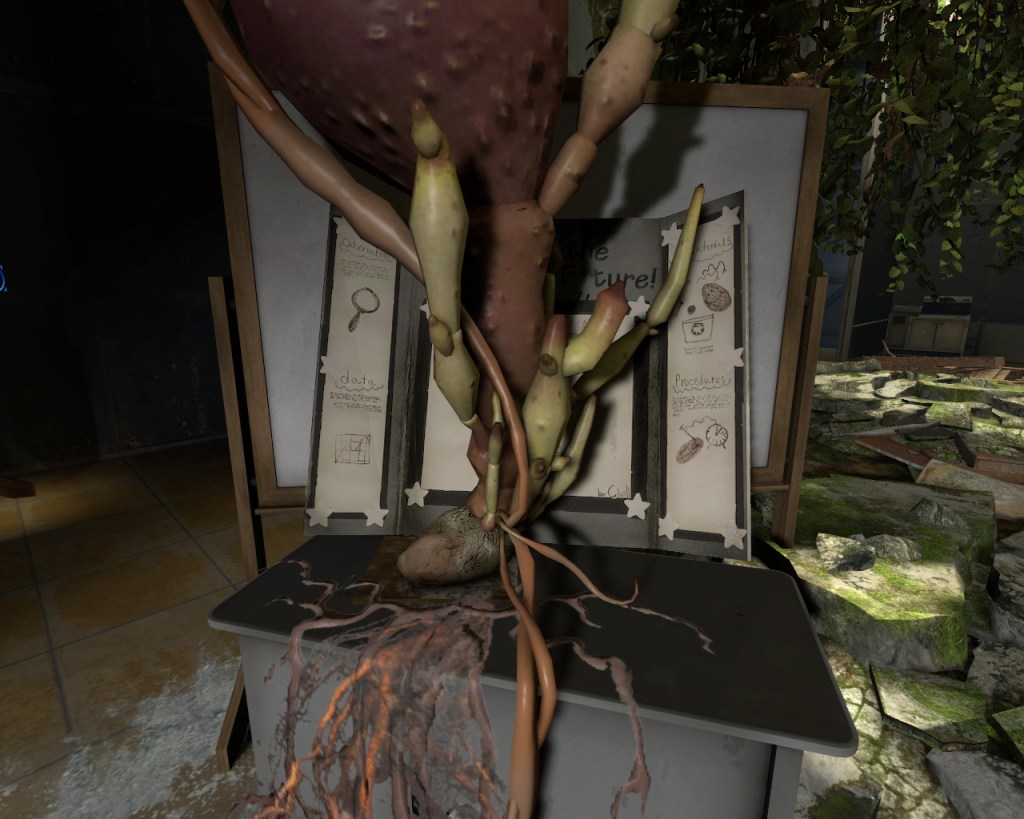
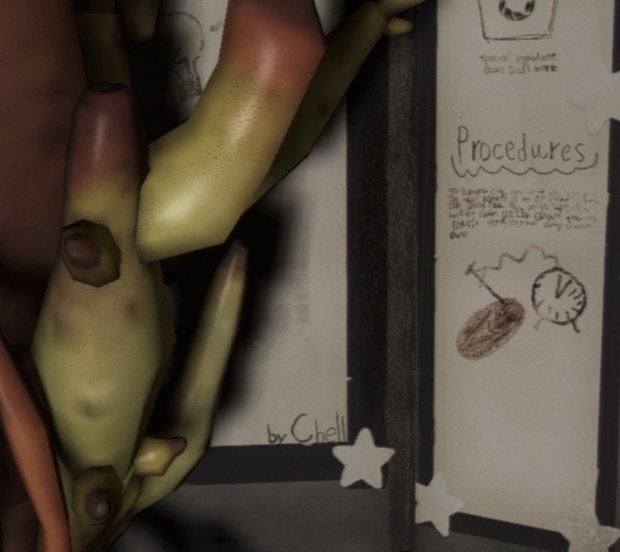
It’s a debated topic, but it’s possible that Chell was a lovechild conceived by Cave and Caroline, and in order to protect Cave’s reputation, was consequently put up for adoption. Whether you choose to hop on that bandwagon or not (I’m totally on it!), the potato experiment from Bring Your Daughter to Work Day does prove that Chell was at least the daughter of SOMEONE at Aperture Science.
Speaking of that potato experiment…Chell’s potato is much, much bigger than everyone else’s, it’s even grown up into the ceiling! Why is that? It’s likely that Chell used some sort of chemical on her potato, as her Materials section states that she used a ‘special ingredient from Dad’s work’. No ordinary scientist would have access to a chemical like that, only someone pretty high up would. Someone like Cave Johnson, perhaps?? Given the fact that his experiments cause people to grow a bunch of tumors, we know he’s not the most ethical guy. Surely, he wouldn’t care about helping his kid cheat in a potato experiment.
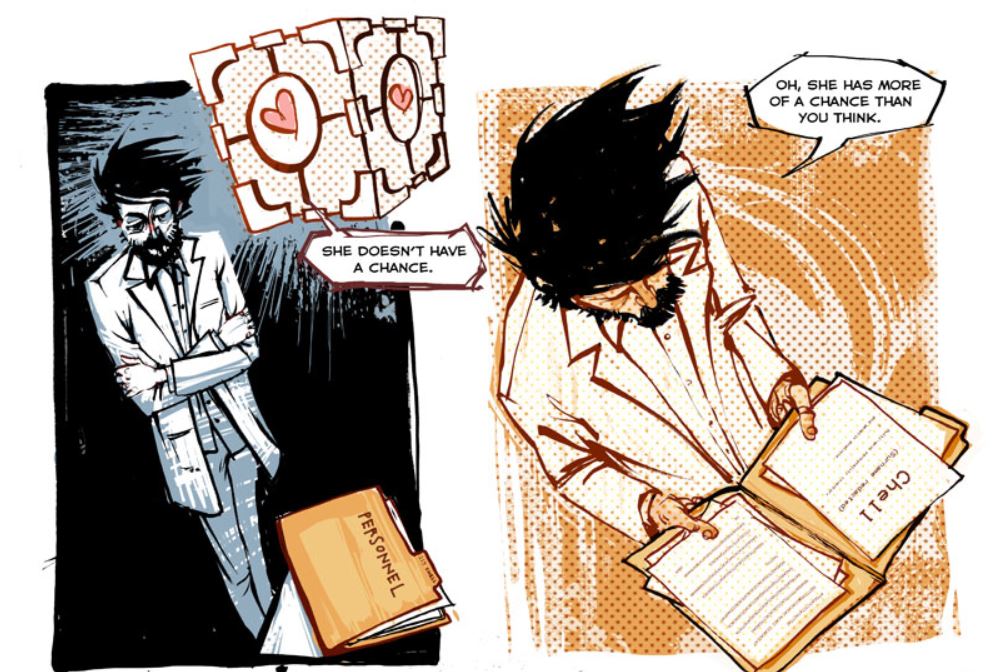
Some will argue that the adoptive parent could have been Doug Rattmann, the man who leaves drawings and messages throughout Aperture to help you escape. I love the theory, but at least for me, I don’t think Rattmann is her adoptive father.
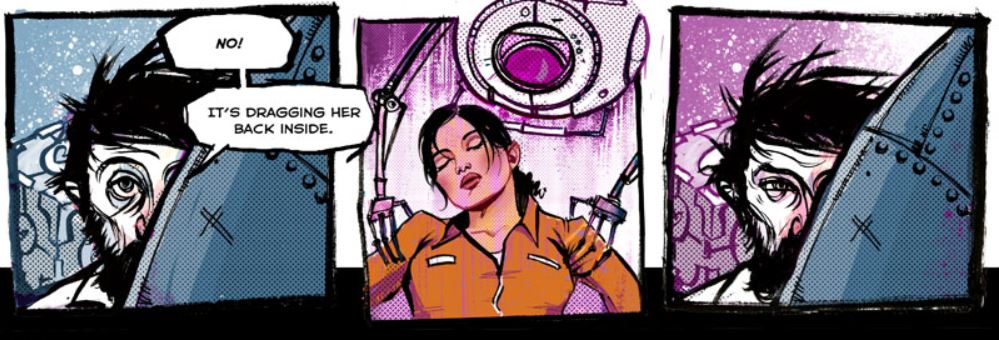
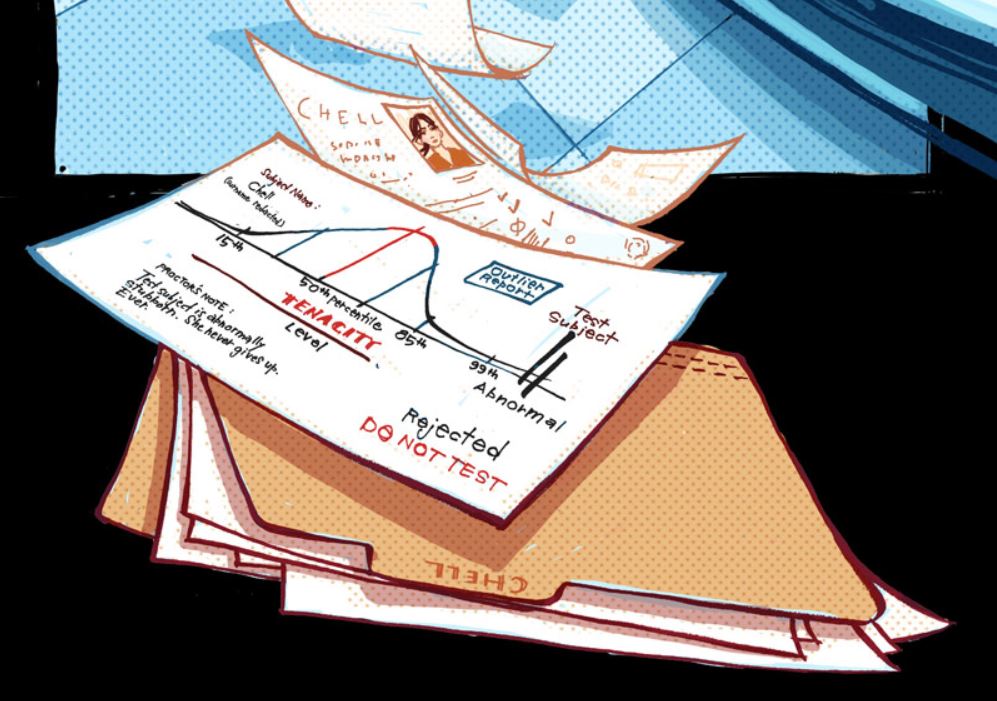
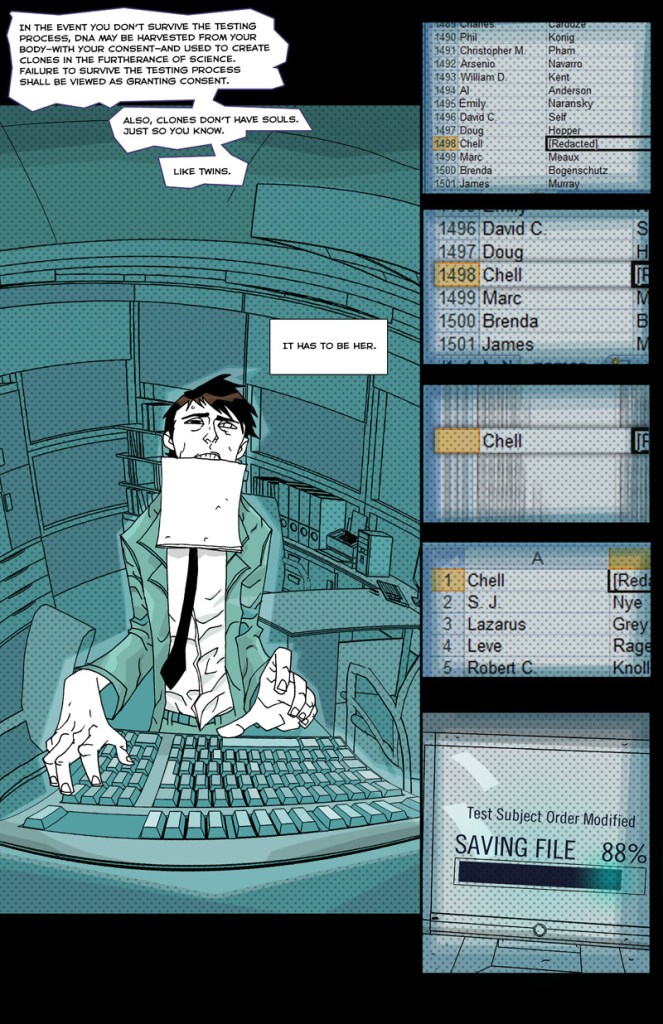
The the ‘Lab Rat’ comic, Rattmann sees Chell get dragged back into Aperture and chooses to go back in to help her escape. It’s a noble gesture, but he never mentions anything about saving his daughter. His companion cube even asks why he’s go back in when he’s finally free. If that were his daughter, I don’t think there’d be any question. Rattmann also explains to the companion cube why he chose Chell to face off with GLaDOS in the first place…when he saw her file, she was actually failed as a potential test subject because her tenacity was in the 99th percentile and had a note that she “Never gives up. Ever“. I just doubt that he would have to go through any of her files to know that if he had adopted her. He believed that she was the best person to beat GLaDOS and get them out of there, so he found the list order of test subjects and moved Chell from #1498 to #1 so that’d she’d be the first to wake up.
It isn’t until GlaDOS is in the potato that she starts to remember Caroline, and it isn’t until GLaDOS remembers that she’s Caroline that she realizes that Chell is her daughter, not her enemy. What triggers her memory is hearing the recordings of Cave Johnson and having a response to them. That leads to GLaDOS becoming more compassionate towards Chell as the game progresses, even calling Chell her best friend at the very end.
The first time I played through this, I kept waiting to be tricked by GLaDOS in the end…there are so many times that you think you’ll finally escape Aperture Labs, only to find yourself falling into another pit. When you beat Wheatley and are grasping onto him so that you don’t get sucked into space, GLaDOS says “I already fixed it, and you are NOT coming back”. She reaches through the portal, breaks Chell and Wheatley apart, and pulls Chell back to safety. I won’t lie to you, I didn’t trust GLaDOS when she was reaching through.
Then GLaDOS gives you a goodbye after deleting Caroline from her brain, or at least says that she did. GLaDOS says the name Caroline after ‘deleting’ her, so how would she remember anything about Caroline if she were really deleted? There’s also a line in the Want You Gone song, “Now little Caroline is in here too”. As stated on theportalwiki.com/wiki/Caroline, even the voice actress of GLaDOS, Ellen McLain ‘stated on a panel at Anime Midwest 2011, that to her belief, Caroline is not deleted at all’.
Anyway, she sends Chell back up to the surface on an elevator saying, “It was fun, don’t come back”. The elevator stops, opens, and you see four turrets aiming at you. Now I’m thinking, Ok! Here’s the trick! But I was fooled again, the turrets turn off their lasers and start their adorable singing. They begin humming the tempo the Cara Mia Addio song coming up. The elevator continues up a bit and slows down as you look into an atrium full of turrets, and they all begin their cute singing.
I’ll start with the lyrics themselves:
Cara bella, cara mia bella!
Mia bambina, oh ciel (Chell)!
Ch’ella stima!
Ch’ella stima!
O cara mia, addio!
La mia bambina cara…
perché non passi lontana?’
Si lontana da Scienza!
Cara, cara mia bambina…
Ah, mia bella!
Ah, mia cara!
Ah, mia cara!
Ah, mia bambina!
Oh cara, cara mia…
Beautiful dear, my darling beauty!
My child, oh heavens (Chell)!
How I adore you!
How I adore you!
Oh my dear, farewell!
My dear child…
Why don’t you walk far away?
So far away from Science!
My dear, dear baby…
Ah, my beloved!
Ah, my dear!
Ah, my dear!
Ah, my little girl!
Oh dear, my dear…
Holy shit, right?? This to me is the strongest implication that Caroline was Chell’s mother. Once you see the lyrics translated into English, it’s pretty clear. Another cool fact is that the song is sung by no other than the voice actress for GLaDOS herself, Ellen McLain. She actually improvised the lyrics to this song in her ‘bad Italian’ she learned in high school. The lyric “Why don’t you walk far away? So far away from science!” sticks out to me a lot. We know that Caroline was essentially married to science, but her dedication to Aperture made he give Chell up for adoption. It’s because of science that Chell ended up a test subject and Caroline ended up as GLaDOS.
Chell gets out of the elevator and finds herself in a field. She hears some loud thumps, turns around (I’m still feeling like this a trick) and a burned companion cube bursts through the door ❤
It’s said that this is the same companion cube that Chell had to incinerate in Portal 1, and I believe it! Seeing that cube at the end gave me a huge smile. That detail really felt like a cherry on top of the cake that definitely isn’t a lie.
Bonus
A picture of my cat Chell, named after the badass heroine of this game, with her little sister, Ellie, named after the badasss heroine from The Last of Us.
Portal 2 Walkthrough Part 2
Here is part 2 of Portal 2 🙂 Coming up next will be spoilers and Easter Eggs!
Enjoy!
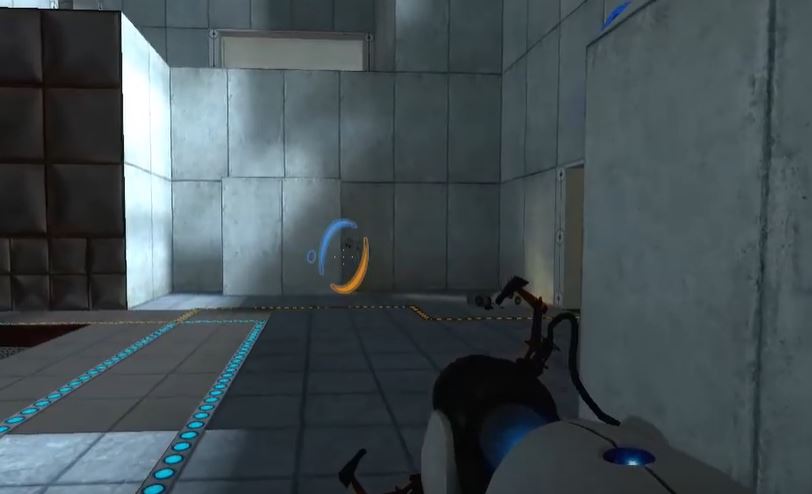
Portal 2 Walkthrough Part 1
Time for one of my favorite games, Portal 2! As I’ve said before, you don’t need to play the first to understand and enjoy the second, but I HIGHLY recommend that you do! I think knowing the sarcastic jokes and story from the first game just makes the second one that much better.
One thing I loved about the first was how eerie the environment was…you’re in a completely abandoned facility, and I’ve always been a sucker for post-apocalyptic type environments and stories. When you get into Portal 2, the facility is even more abandoned and overgrown, so I automatically love that more. You still get the sarcasm and dry humor in this game, and after building off of the satire of Portal 1, I think the jokes are even funnier.
I don’t want to dive too deep in the story here since only half of the walkthrough is posted here, but once I beat the game I’ll get into another post full of story elements and Easter Eggs.
Enjoy!
I want to add that I misspoke about a part of Rattmann’s story. He is not the one who put Chell into the cryo-chamber after Portal 1…why would he do that?? lol
He saw her getting dragged back into the facility at the end of Portal 1, so he went back in to save her. By the time he found her, she was already asleep in the cryo-chamber and her life support was offline. He fixed her life support in hopes that she could one day be woken back up and get out. Just wanted to clear that up 🙂
Portal – Easter Eggs and Spoilers!
This is the fun stuff for me! I love finishing a game and looking up the things that I missed; Easter Eggs, spoilers, and theories. As I played through the game again, I remembered some of the Easter Eggs, but not all of them. So I wanted to dive in and do some research. I went back to show how to get some achievements and will include pictures an videos below.
This should go without saying, but the following is heavy with spoilers, so if you haven’t played or watched Portal….go do that!!
ACHIEVEMENT: camera shy
There are 33 cameras in all that you can destroy with your portals. Below I have a video walk through, I was sure to look at the chamber levels before continuing so that anyone could reference where I was in the game. Take note that there aren’t cameras on every level, and that some levels have more than one. You should also know that you’ll see more than 33 cameras, but not all of them can be detached. Thos include cameras in chambers before you have the portal gun, and any cameras on walls that you cannot put a portal on. In addition to the video, I’ll include a list of which chambers have cameras and how many there are in each if you feel like trying to find them on your own!
Camera Locations:
Chamber 2: 3 Cameras
Chamber 3: 3 Cameras
Chamber 4: 2 Cameras
Chamber 5: 3 Cameras
Camber 10: 1 Camera
Chamber 11: 1 Camera
Chamber 13: 3 Cameras
Chamber 15: 5 Cameras
Chamber 16: 5 Cameras
Chamber 17: 2 Cameras
Chamber 18: 2 Cameras
Chamber 19: 3 Cameras
ACHIEVEMENT: Transmission RECEIVED
From what I’ve read, this achievement cannot be done until one full play through of the game. There is a radio with a red light on each level (and a few during the escape portion of the game) that you have to pick up and take to a certain place within the level. When you get to the right place, the music should change to static and the red light will turn to green.
I won’t pretend that I didn’t have to look a few of these up, some of the radios are really well hidden! I have a video below for a full walk through on how to get each one.
The cake is (not) a lie
So the cake GLaDOS keeps promising you turns out to be a giant furnace instead. Except you do see the cake after getting dragged back into Aperture Labs and right before the credits roll. A few times throughout the game, you can see nods to the cake.
You’ll come across a few large computer screens during the escape portion of the game. The screens have a lot of corrupted code and what looks like gibberish quickly scrolling up, but if you look closely, you can see ingredients to the cake!
On the screens in GlaDOS’s chamber, there are a lot of pictures quickly flashing by. A few of those pictures are of cake. Also, while you’re holding the Intelligence core, it’ll be reciting the cake ingredients.

The design for the cake is based off of a real cake in the bakery near Valve headquarters. The real cake itself is called the ‘Black Forest Cake’ and is made at the Regent Bakery and Cafe in Bellevue, WA.
The ingredients, according to GLaDos, are:
- 1 (18.25-ounce) package chocolate cake mix
- 1 can prepared coconut–pecan frosting
- 3/4 cup vegetable oil
- 4 large eggs
- 1 cup semi-sweet chocolate chips
- 3/4 cup butter or margarine
- 1 2/3 cup granulated sugar
- 2 cups all-purpose flour
Fish-shaped crackers - Fish-shaped candies
- Fish-shaped solid waste
- Fish-shaped dirt
- Fish-shaped ethylbenzene
- Pull-and-peel licorice
- Fish-shaped volatile organic compounds and sediment-shaped sediment
- Candy-coated peanut butter pieces (shaped like fish)
- 1 cup lemon juice
- Alpha resins
- Unsaturated polyester resin
- Fiberglass surface resins and volatile malted milk impoundments
- 9 large egg yolks
- 12 medium geosynthetic membranes
- 1 cup granulated sugar
- An entry called: “How to Kill Someone with Your Bare Hands”
- 2 cups rhubarb, sliced
- 2/3 cups granulated rhubarb
- 1 tbsp. all-purpose rhubarb
- 1 tsp. grated orange rhubarb
- 3 tbsp. rhubarb, on fire
- 1 large rhubarb
- 1 cross borehole electromagnetic imaging rhubarb
- 2 tbsp. rhubarb juice
- Adjustable aluminum head positioner
- Slaughter electric needle injector
- Cordless electric needle injector
- Injector needle driver
- Injector needle gun
- Cranial caps
- 1 tsp. vanilla extract
- 2/3 cup cocoa powder
- 1 1/4 tsp. baking soda
- 1 tsp. salt
- 1/4 tsp. baking powder
- 1 to 2 (16 ounces each) cans vanilla frosting
- A 20-foot thick impermeable clay layer
Those ingredients, for several obvious reasons, shouldn’t really be used to bake your own Portal cake. There are, however, a lot of recipes out there that mimic the look of the cake and sound delicious. On Regent Bakery and Cafe’s website, they list the Black Forest Cake as “Chocolate cake with custard cream filling and bing cherries. Decorated with fresh whipping cream and chocolate shavings”.
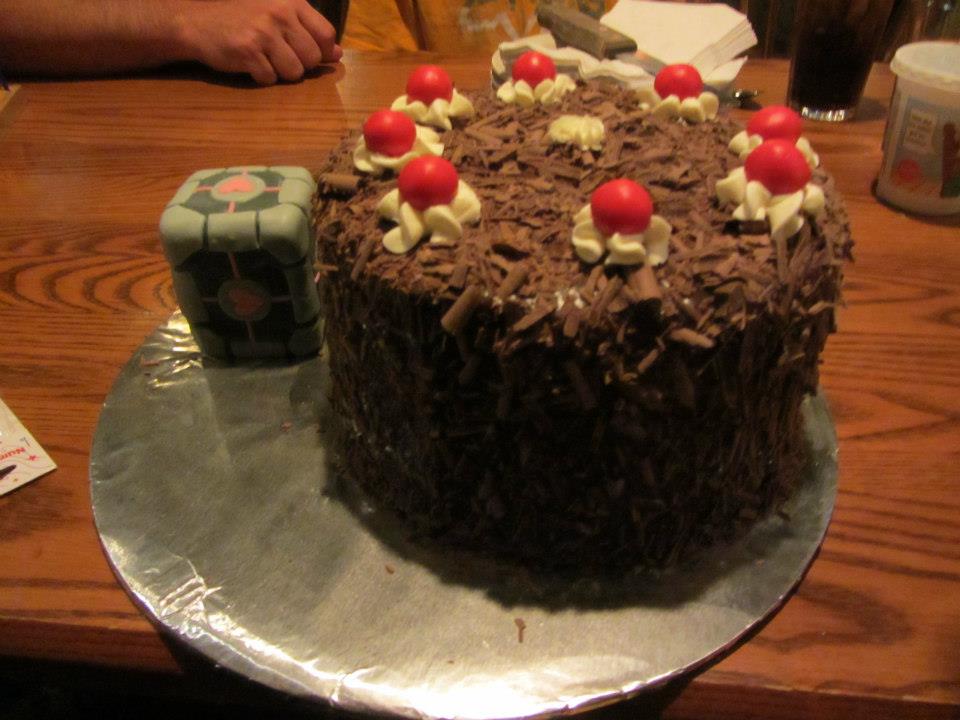
For one of my birthdays (23rd maybe?), my family got me a Portal themed cake with an adorable little cake Companion Cube. To this day it’s been one of my favorite birthday cakes!
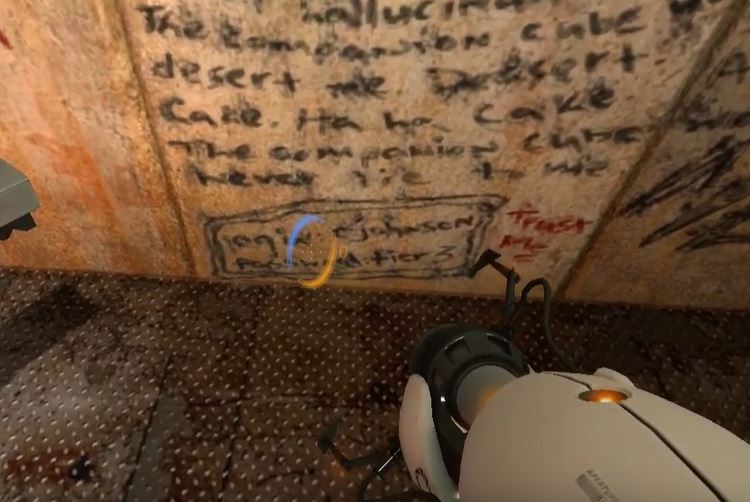
Website Login
In Test Chamber 17, there is a Rattman Den (shown in pictures below) that has a login and password scribbled on the wall. You can see the login (CJOHNSON) and password (TIER3) once you move a detached camera on the floor out of the way. The login and password go to the site aperturescience.com, but it’s been updated to no longer need the login and password. You should still check out the site for an adorable little easter egg though!
When aperturescience.com was first put up in 2006 and you could log into it, you were able to put in commands. The most interesting, I think, is when THECAKEISALIE is entered, you would be sent to this page:
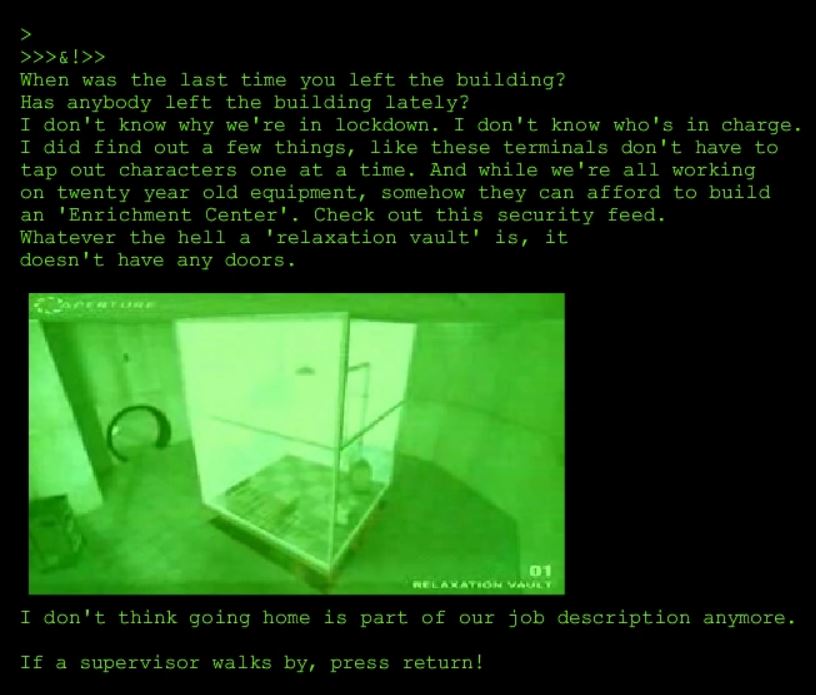
It’s presumed that this page was made by Doug Rattmann, the man that leaves you ‘the cake is a lie’ messages throughout various chambers. You can see the relaxation vault that Chell wakes up in at the beginning of Portal here.
Doug Rattman
As the player, you never see Rattmann in the game, but his story can be found in the comic Lab Rat, published in Valves own comic book ‘The Sacrifice and Other Steam-Powered Stories Volume 1‘. I highly recommend getting this comic book! It gives such a cool insight to Portal and other games published by Valve.
Doug Rattmann (aka Rat Man) is a former scientist at Aperture Labs and is the only known employee to survive GLaDOS’s neurotoxin attack. He’s a paranoid schizophrenic, and since he’s trapped down in Aperture, he has very limited amounts of his medication left and no access to get any more. He saves the meds he has left for when he really needs them, which causes his schizophrenia to act up. He carries with him a companion cube that he speaks with, and he leaves drawings and messages for Chell throughout Aperture Labs to help her escape.
In the first Portal, there are five Rat Man dens. You can find them in Chamber 16, 17, 18, and the last two in Chamber 19.
There is a lot more to be said about Rattmann; I love his side story! But I’d like get through the Portal 2 walk through before talking about him more.
Bring Your Daughter to Work Day
This is another topic that I want to cover more after posting the Portal 2 walk through. I will say a little though! You can hear GLaDOS mention Bring Your Daughter To Work Day a couple of times throughout Portal. This particular day is the day that GLaDOS was turned on and is also the day she filled the place with deadly neurotoxin. I don’t this is the day she killed everyone, because I know she was turned off at some point and had the morality core installed in her so that she wouldn’t try to kill everyone again. But yeah…we know how that ends.
Black Mesa
Aperture Science is to Portal as Black Mesa is to Half Life. Both games (and companies) are made by Valve. Aperture Science and Black Mesa are rival companies in the same universe and are always trying to out do one another. There are some references to Black Mesa in Portal: there are slides comparing Aperture Science and Black Mesa in some of the offices, and GLaDOS has a line:
“Maybe you’ll find someone else to help you
Maybe Black Mesa
THAT WAS A JOKE
HAHA. FAT CHANCE”
in the Still Alive song during the credits. I didn’t get that joke the first time I played the game, but now that I get it, I love it.

I obviously love this game, but I’m more excited to get back into Portal 2! It’s one of those rare games to me that was not only better than the first, but actually made me love the first more, too. I’ll get to playing and get it posted soon!
Portal Walkthrough Part 2
Here is the second half of Portal! It starts out right after Chell escapes the giant oven GLaDOS tries to dump you in. You go through some back parts of Aperture Labs until you come face to face with GLaDOS herself ![]()
I’ll follow up with Easter eggs, theories, and achievements in my next post 🙂
